I have been asked a few times, how to expose LOG footage correctly or "how do I get perfect skin tones when using LOG." Since more and more footage is being shot with various LOG gammas I thought I'd go a little deeper into the subject.
With older cameras everyone shot with a standard non gamma profile, where what you see is what you get. Skin tones were generally placed around 70 percent on a waveform, and to be safe, you'd stop down a fraction to protect your highlights. With LOG gammas everything changed.
Cameras can now record more and more stops of dynamic range, but at present the finished product hasn't changed, i.e. television sets still only show around 6-9 stops of dynamic range. The metaphore often used for this situation is a bucket. Your camera is a large 15 stop bucket which needs to pour its footage into a much smaller REC 709 bucket TV.
So firstly why use a LOG at all if that extra dynamic range can't be used? The answer is really about choice. Protecting the highlights and shooting all of this range in contrast means an editor can keep that information in the grade to create a better finished picture. They can apply a LUT in post which will map the LOG footage to a 709 curve. Highlights, such as a bright sky can be brought down to create a better picuture.
A cameras maximum dynamic range will only be availble when recording in LOG. To give you an example from my camera (Canon C300 mkii), it will record 14-15 stops of DR on LOG2, 13.5 stop of DR on LOG or LOG3 and 11.5 in BT709. So wherever possible I shoot with a LOG curve to give the maximum I can give to the editor. Sony cameras shoot S log, but the curves are essentially doing the same thing.
So how do we expose LOG correctly?
There are a few things you hear all the time on this subject, and these are also three things I'd recommend doing:
1) Expose to the right (meaning to the right of the histogram i.e slight over exposure).
2) Use an 18 percent grey card
3) Send a normal REC 709 curve to the monitor/eye peice and expose that as you normally would
Three diferent methods, so which one is right?
Essentially they all are.
Lets work through these points in reverse order.
3) Send a REC 709 LUT to the monitor/eye peice
A LUT or look up table can be used to give an aproximation of what the footage will look like after a grade. You are still recording in LOG but you can look at a more saturated and colourful image for shooting purposes. It's important to note that you are just overlaying a LUT not applying it, so this is an aproximation of what the footage will look like in post. The reason I bring this up is I have noticed different monitors, eyepeices and LCDs treat this LOG footage with a LUT slightly differently. Sometimes one colour might look slightly odd or different, but it doesn't matter as all the information is recorded correctly in the LOG footage.
This works well in my opinion and it is quick and easy. Many monitors and eye peices have their own 709 curves, or you can apply them from the camera. It's worth testing it out to see if it works well for you. There are lots of ways to test this out, but just expose something using the 709 curve and then flick back to the LOG and you'll be able to see what is happening.
Typically the LOG footage will look under exposed by a couple stops, as it is retaining extra highlights. You could throw in a grey card to the scene as well so you can get a reading of middle grey.
To make this clearer, here is how the above might work. You apply a 709 LUT. You frame up a persons face. You expose that face as you think looks correct. (You could even set the wave form to respond to the LUT footage instead of the LOG) The skin tones will be sitting at about 70 on a waveform monitor that is looking at the LUT. You keep the same exposure and remove the LUT. The wavform reading will drop from around 70 to between 32-38 depending on how your cameras LOG works.
There are other advantages to using a 709 LUT for your monitor. The added contrast helps massively with focus. LOG footage tends to all look a bit grey and wishy washy, adding a LUT will give saturation and this helps (my eyes at least) see what is in focus, somehow the image clicks in and bites when its in focus.
I like to show LUT images certainly to clients and even directors. Some directors are tech savy and happy to look at LOG footage, but for the most part a LUT image is the way to go.
2) Use an 18 percent grey card.
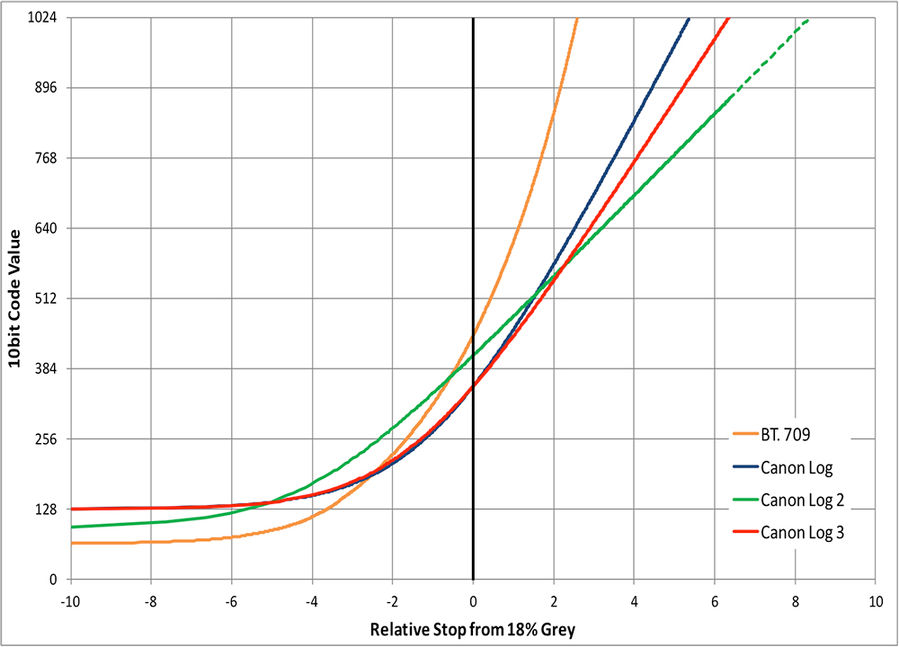
Most LOG curves put middle grey around 32 to 38 % If you want to know exactly, look up the white paper on your particular camera. For the C300 mkii LOG3 and LOG set middle grey at 38% and LOG2 is at 32% Sony's S logs are usually pretty low around 32% If you aren't sure, just try it out. You could set the monitor to 709, expose a grey card by eye to what you think it should look like, then flick on the LOG curve and waveform and see where it sits. Chances are that grey will sit somewhere around that 32-38 level.
This is also very useful for nailing correct skin tones. Slightly tanned caucasion skin is going to sit at 18 percent grey. You can use your judgement to get your subject exposed correctly. You can allow a very pale skinned person's skin to sit higher than this on a wave form and very dark skin to sit slightly below this level.
1) Expose to the right.
Okay, so from the two points above we know we are going to be essentially underexposing our LOG footage as compared to REC 709. However, "expose to the right" means over expose! So how does this work?
Colourists find it easy to pull down highlights than to lift stuff from the shadows. The reason for this is that under exposed LOG footage often gets grainy or noisy when you try to lift in post.
So why should we expose to the right?
This comes down to how the camera deals with information. From middle grey up to maximum white, cameras have large amounts of room to store data. A cameras sensor has a certain number of steps per channel and will distribute these steps favouring the top end of the scale. It therefore makes sense to use this section of the scale to record our most critical peices of information - hence "expose to the right"
So the we need to use our judgement with the term "expose to the right." If we have a dark scene with no highlights and a face is our subject, we can afford to expose to the right, as we won't lose any highlights and we will be setting our exposure where the camera records lots of data. If there are many highlights we need to preserve, then we should set our exposure accordingly.
A quick word on ISO and correct exposure.
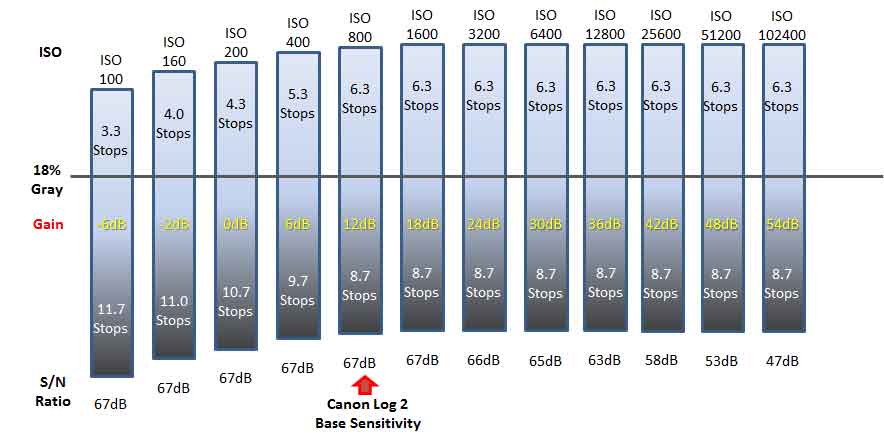
The image above is from the Canon website, which has several white papers on the their cameras and is well worth a look.
As you can see from the image above base ISO for the Canon C300 mk ii is 800. Interestingly as the ISO is lowered the number of stops available over middle grey are also lowered. With this in mind, it would make sense to lower exposure using NDs in bright situations, rather than simply lowering the ISO.
It's also worth pointing out that LOG curves don't usually work well in low light. This makes sense when you think about it. LOG is very good at preserving highlights when you have a scene with high contrast. However, in a low light scene you have very low contrast, so it makes sense not to use a LOG curve in this situation. LOG2 in particular starts to look noisy when you push it above its base sensitivity.
I would advocate turning off LOG altogether when shooting in low light, but I know many have reported good results when shooting the original LOG1 in low light.