Daniel Haggett

London based Lighting Cameraman / DoP

Recent Work

Shooting in Low light with Canon C300 picture profile

I was asked to shoot a music video for American act, Austin Mahone the other week.   The job was pretty last minute and the label wanted to shoot it around the main scenic tourist spots of London.   Everything had to be shot at night, partly for the look of it, and partly so we could actually move around London easily.  The only issue was there was no room for any lighting at all.  We had to be extremely manoverable and so kit was kept to a bare minimum (not even a tripod).  

I wanted a picture profile that could handle extremely low light.  Clog, seemed a bad idea as you immediately lose a few stops of light with this profile, and also that profile is aimed at preserving highlights, of which there would be very few when shooting in almost complete darkness.


Many of the C300 picture profiles contain some sharpening, which I really didn't want.  If there is any noise in the picture, the last thing you want is for a digital sharpening effect to highlight it.  If you are doing this on the fly and want a quick picture profile that works best in low light, I would recommend using Normal 1, with all the sharpening removed.  

Able Cine have a specially made low light picture profile, which is very similar to Normal 1 with sharpening removed although they have also changed the colour matrix slightly to aid shooting in low light.  I used it here and am pretty happy with the results.

Click here to download the low light profile from AbleCine and see the video below.


{youtube}https://www.youtube.com/watch?v=IXCSnYhwiwg&list=PLzalxJWB9vOP6_8uzhEeFOKlse4IioKFe{/youtube}

4k Camera Comparison

Of late there have been so many new 4k cameras coming to the market, I thought it was time for a quick round up of what is about.


Camera Resolution Slow motion Price USD Dynamic range
Black Magic PC 4k None 2k 13 stops
Blackmagic Ursa 4k 100fps 6k -6.5k 12 stops
AJA Cion 4k 60fps (120fps externally) 9k 12 stops
Canon 1dc 4k  60fps at 1080 10k  12 stops
Panason Vari Cam 35 4k 120fps ? 14 stops
RED Epic 5k 120fps at 4k 17.5k 13.5 stops
Canon C500 4k 120fps (external) 20k 12 stops
Sony F55 4k

150/180 fps

(240fps external)

29k 14 stops


Blackmagic URSA   AJA Cion


Of course, resolution and frame rates are only a tiny peice of the story.  Usability, the actual dynamic range, colour handling, funtionality, from things like view-finders, shoulder mounts inputs outputs etc etc, will all effect whether a camera is worthwhile buying and not the sort of thing you can work out from a press release.

The Blackmagic Ursa does look like it goes along way towards becoming what camera operators would actually need and want from a camera.  The design is not disimilar to older ENG cameras: with audio outputs where they should be (at the back of the camera) a decent top handle and it also looks fairly well balanced.  It is also a camera that can be upgraded later by the user, and even the chip itself can be replaced later down the line if something more advanced is made available.


If you are interested in shooting lots of slow motion, the Red Epic is interesting as can shoot 120fps at 4k and can shoot up to 300fps on a sliding scale with resolution dropping down from 4k.  This is amazing when you consider how much people were paying for phantom shoots only a few years back.

Sony F55
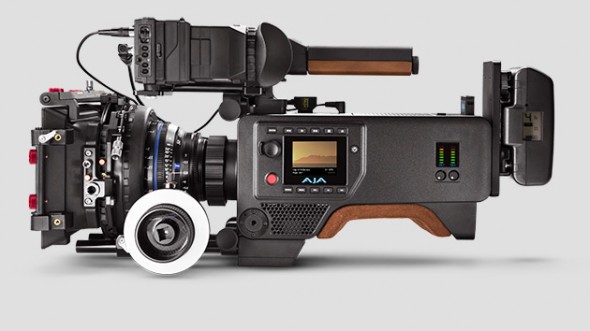
As far as ergonomics and usability go the Sony F55 is definitely up at the top.  Sony have been making ENG cameras for years, and the F55 is a nice block of a camera to stick on your shoulder and it has a proper view finder in the right place.

Although I don't imagine many productions demanding 4k anytime soon, having the ability to shoot slow motion is always going to be a pull for directors, especially when it is in camera.

For me a massive question about any of these cameras would be reliablitily.  If you are shooting in New York, London or another big city and your AJA Cion stops working, you might be able to get another quickly from a rental house, or you might be able to get it fixed quickly.  I do so many shoots in far off places, I need to know, beyond a shaddow of a doubt that the camera is 100 percent reliable, or if there is an issue there is somewhere I can find get the issue resolved.

Although there is no exact price on the Panasonic yet, they have been rivals of Sony for years, with earlier versions of the varicam and we can expect the price to be pretty close to that of the F55.  The word on the internet seems to be the price will be "under 60k USD" Although that is pretty obvious, since the F55 is way under that.


varicam 35 4k
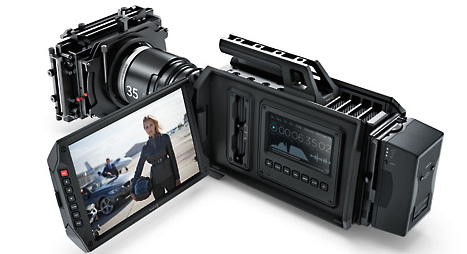
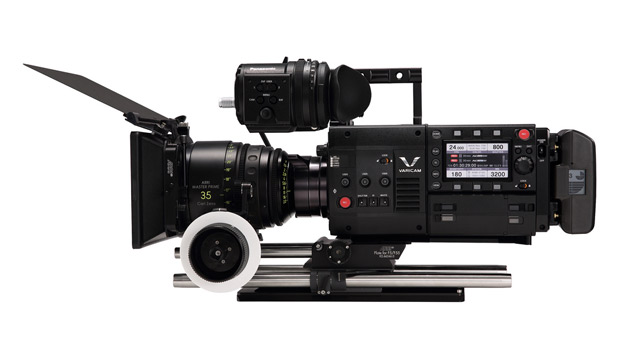
Many people will probably be wondering whether the price of the Epic/Panasonic Vari 35/Sony F55 will drop as a result of these new cheaper alternatives.  It is hard to say, but personally, I don't think so. The prices are so different they are really separate markets.  A DoP thinking of buying a new F55 might be easily persuaded to buy the Panasonic instead if the price is better, but I dont imagine the same is true of the cheaper 4k cameras.  Apart from anything else, owning a camera most production managers have never heard of means you'd have to do a lot of explaining and persuading to get it on a job.  So who will buy the new New BM Ursa or Aja Cion?  I can see independent fim makers buying these, or small production companies buying them as their in house cameras.    Having said that, what about the 1DC?  Desptie the 1DC dropping its original price down to 10k, it is still 10,000 US dollars for a stills camera.  The blackmagic Ursa is a fair bit cheaper and on paper looks like a much more usable film camera.  If Canon still want to pitch the 1DC to independant film makers they may have to further reduce their prices.


One thing is for sure, cameras shapes and sizes are merging back towards what we first had with ENG cameras like the Beta SP, DigiBeta etc.  All of these new offering look very similar.  Manufacturers have obviously seen how all us operators have been struggling along for the past few years, with odd shaped boxes on our shoulders and a whole load of 3rd party periferals attached to the camera.  Most of these new cameras seem to have lept forward in ergonoimics as well as technology.

Further reading:

4K Cameras: Should I care


ethics

I have been writing blog articles for around 2 years.   I recently joined the B&H and Amazon Affiliate programmes.  If you buy anything through one of these links on my site, I earn a small commission.  This will not effect the kind of reviews I write.  On the whole I tend to write about equipment I use on a regular basis, if I am using it is probably because I like it, and not because I will earn a couple of dollars if someone buys it through Amazon.

If you need to buy something from B&H or Amazon, consider getting there through clicking on one of the links on my site, as that is what keeps the site running, and encourages me to write more articles.


4k cameras should i care

There seems to be a mass of 4k cameras becoming available.  The latest offering from NAB in Las Vagas talk about cameras with better and better specs, for cheaper and cheaper prices.  So when do you ditch your HD camera, in favour of something that shoots 4k?

As a cameraman it is always good to be slighltly ahead of the game.  When a Production Manager phones up and asks you to shoot on a certain camera or format, it always works best if you can say yes, rather than phone a rental company, get specs and prices and call them back.  When people were first getting interested in shooting on DSLRs I got in early.  I had the rig, the right lenses, knew the right way to record audio and knew what was acheivable and what wasn't.  The bottom line was, I got good work and made good money.  The same was true when the Canon C300 came out, I pre ordered the camera and was ready to go as soon as the interest started.

It wasn't that easy with every camera buying decision.  In the early days of HD I managed to get a very good deal on a Sony F900 with a friend.  The F900 was, I guess, the Arri Amira or the Sony F55 of its day, it was used to shoot Star Wars III, it was capabable of shooting HD at 24p 25p or 30p, which was very unusal at that time.  Most TV productions back then were shooting with Digi Beta, whilst lower budget work (news, sports, corporate) were beginging to shoot on DVCAM.  The Sony F900 was streets ahead of these cameras and I was hoping I could clean up.  I didn't.  There were a few issues 1) The tapes cost several times more than the other cameras. 2) the decks for the tapes were 50k to buy, or a lot to rent and few companies owned them. 3) Editing systems often didn't have the space to capture everthing in HD.  When people called me to ask if I could should something in Digi Beta, I would try to persuade them to go HD at a reduced price and very often, the productions simply couldn't afford it.   The only work I got with it was on high end, high budget documetaries.  Meanwhile the value of the camera was droping like a stone.

Blackmagic ursaThe Black Magic Ursa, starting at under 6,000 dollars.  Records apple pro res 422, or RAW. 


 AJA CionThe AJA Cion

4k

Apple Pro res 444 or 422

9000 USD


My point, in this rather long and drawn out story, is that it is good to be slightly ahead of the game, but there is no point in being years ahead of the game, as cameras devalue fairly rapidly.  This years NAB is awash with 4k cameras, each one cheaper than the last.  Camera manufacturer obviously want to push and sell new technology, and Sony have an added insentive as they can sell 4k TVs too.  However, it is good to keep the end user in mind, as this will ultimately be what drives demand and dictates whether you get a phone call asking to shoot 4k or not.  At present masses of channels aren't even broadcasting in HD yet, let alone 4k.  Loads of DVDs are being watched, which are not even HD and more and more people are watching content online - where 4k is likely to be a hinderance rather than something to be desired. 

With this in mind, how many people are likely to be dissatisfied with the resolution of their HD TV at home and want to upgrade to 4k?  In a cinema 4k makes sense to me, you have a huge screen and resolution could reasonably be improved, however, I am not sure the same can be said for  40 inch TV in the home.

This is not to say I think there will be no interest in 4k.  There are lots of points that will draw productions towards it, special effects work or even just edits where Directors want the option to crop into the image for a normal HD production.  4k also gives the cameraman the option to digitally zoom in and use super 16 size lenses for HD productions.  So 4k does have its benefits. Eventually TV, film, broadcasting and camera technology will push on ahead and 4k will be mainstream, however, I won't be buying a camera just becuase it shoots 4k before the phone calls start coming in.

Further reading:

Cnet.Why 4k TVs are stupid.  

Variety. Hollywood says "Meh to 4k TVs"

Canon C300 firmware update

I don't usually get that excited about firmware updates for the C300, as in the past the new features haven't been of much interest to me, however this latest issue (1.1.1.1.00) has a couple of features I have been wanting for ages.  

1) You can now assign a seperate funtion to the grip wheel and the funtion wheel, so you can now control iris and ISO on two seperate wheels.  You no longer have to press the function button several times.  At last!!!  I have been going on about this for ages! This will make shooting some much easier.

2) You can shift the area you zoom into to check focus.  This is something I always loved about the zoom in function on DSLRs so I am glad it made it over to the C300.  

3)  Although I haven't tested it yet, they new Canon Wide Dynamic Range profile looks pretty good.


When adding the new firware you need to format your SD card first, so it is a good idea to put any saved picture profiles you have on to your computer (not the camera like I did, which then got wiped when I updated the firmware).  Once you have dropped the FIM file onto your SD card you can scrol to Firmware and update on the camera.  

Warning!  The after the firmware update the camera sets everything to default.  This means the camera will set to interlaced, so don't forget to put everthing back to the shooting mode you want.

To set on scrol wheel to iris and the other to iso, go:  Menu>Settings>Custom function>Control Dial   and Grip Ctrl Dial.

Since I am on the subject of C300 menus, here are a couple of other functions I always assign as apposed to the defaults

1) Rec review >entire clip default or last 4 sec.  (the default is the entire clip for some reason)  Settings>Rec review

2) Settings>Custom Function>F.Assist B&W.  This isn't on as default, but I like it.  When you zoom in digitally in sets the screen to black and white, which one, helps with focus, especially with peaking on, and two means that you'll never make the mistake of thinking you are zoomed in on the lens.

Here is a list of all the updates from Canon:

Shooting Enhancements:

  • ISO up to 80,000
  • Wide DR Gamma
  • AE Shift
  • Select the metering mode
  • Flicker reduction
  • 1440x1080 35Mbps to Meet Broadcast Requirements
On-set Support
  • Multi-person Login for the Canon Wi-Fi® Remote Application
  • Record Button Lock
  • Ability to Assign ISO and Iris Operation to the Control Dial
  • Ability to move the magnification viewing area around the LCD using the MAGN Function.
  • Push Auto Iris/One-Shot AF
  • GPS Support
  • Support for New Remote Controller (Scheduled to be available June 2014)


How to take a still photo with canon c300

Taking a photo is not something I am often asked to do on a shoot, although recently I did a job where the client wanted a few publicity stills of the video.  There are two ways to do this on the C300.

1) In video mode.  Assign a button to "photo" and then click away whilst recording video.  The photos are stored on the SD card not the CF card.

2) In media mode. Assign a button to "photo". Pause the video and press the assigned photo button. As in video mode photos are saved to the SD card.

NB I tried to use the same button I had assigned when in video mode and it didn't work, so I then assigned a button in media mode on the top of the camera where many of the media mode buttons are, like play, pause etc are and this worked). 

Using the 2nd method is a great way of getting decent shots, having the choice of multiple frames is great as you never need to take photos when someone is blinking, grimacing etc and you can just role on to the next frame and take your picture.  These pictures are not the highest resolution and tend to be around the 1MB mark.  However this is plenty for the web, when blowing them up full screen on my iMac, the pictures looked great.


How to shoot live music

When I first started working in tv I used to film bands, partly for fun and partly as away to learn how to shoot and edit.  I have filmed loads of bands over the years, from tiny concerts to large festivals and I always enjoy it.  If you are new to filming I would defintely recommend it, there are always bands about who are desperate to have some kind of video and it is a good way for you to pick up some skills.  Here are a few tips:

Get cameras.   Music tends to but cut fairly quickly and you obviously need something to cut to, so the more cameras you can get the better.  Get as many camera owning mates involved as you possibly can.    If you can't get people to shoot, just get the cameras, even a locked off camera pointing at the stage is better than nothing.  A few go pros attached with k clamps will give you another angle and help the edit along.

Learn the song.  You'll be able to shoot a song better if you know it.  Even just one listen will be enough to give you a feel of where a guitar solo might come, or when a backing vocalist might sing.

Shoot non-synch.  This is hugely important.  I have shot low budget music videos where we only had a couple of cameras for a live gig, the only way to deal with this is to shoot tones and tonnes of non synch.  There are loads of ways to do this, you could shoot the band back stage, getting ready, travelling to the venue etc and cut it over the live performance.  Another option is to shoot lots of crowd cutaways.  You can also just shoot lots of non synch of the band playing, for example you can shoot close ups of anyone not singing, or shoot weird angles from behind the band so you can't see what they are playing.  All of these shots can then be cut in with your actual live footage.  Another option, to make it look like you have more cameras on the actual performance, is to get the band to do a run through before the gig starts.  If they are playing to a click track, the shots will cut in perfectly to the live performance, if not you will have to fiddle around a bit in post, but it does work, bands tend to be pretty acurate when they are playing and the tempo will probably match.   The only thing to be cautious of with this route is continuity.  Make sure the band all know not to change clothes between the rehersal and the gig.  The lighting will also need to be the same.

Jam synch.  Lock all your camera's timecode together for the actual shoot.  If your cameras don't all have this function, then at least role for the entirity of which ever songs you are using for the edit, so that the songs can be easily locked together in post.

Audio.  Get a decent recording of the music.  The easiest way is to take a feed out of the desk and put it into one of the cameras that won't be moving.

Here is a performance from Rudamental at V festival which I shot over the summer.  There were quite a few cameras on the actual performance, but there is also loads of non synch of the audience, which was shot before hand.  There were also a couple of go pros mounted just over the stage, which I think worked really well.  


How to get your first job in TV

Getting your first job in Film or TV is really, really tough, so before you start cranking out resumes you need to ask yourself "Do I really want to work in Film or TV?"  Here are a few pointers before we start.

1) People think working in TV is glamorous.  It isn't

2) If HBO/BBC/Discovery posted a job for a Runner/Camera Assistant/PA today hundreds would have applied by the end of the week.

3) TV workers do bankers hours, without the wages.

4) TV work can be unpredictable, at times you'll be flat out busy, at times you might have no work at all.

If this hasn't put you off, and why should it, I knew all of these things when I started and it didn't put me off either, then read on.  Here are my top tips to get your first TV job.

Play the numbers game.  When I first started looking for a job in TV, I applied for a job that over 200 people applied for.  It was for a Camera Assistant.  Do you think the employer read every single CV?  I am guessing they looked through the first few and picked someone they liked.  Did I get the job? No.  Should you be put off by this?  Absolutely not.  All of the good jobs in the world a hard to get. If you go and ask NASA if you can have a go flying one of their space rockets, they are unlikely to say yes, but some dedicated people do become astronauts, by comparison getting a job in TV should be pretty easy.

There was a great Derren Brown "trick" I saw on TV where he tossed a coin 10 times, and 10 times it was heads.  How did he do it?  Did the camera cleverly cut without us realising? Was the coin a fake? Nope, he just tossed the coin a lot.  It took him the best part of a day, but in the end he got the result he wanted.  The odds of a coin landing on heads ten times in a row, is not high (it is 1/1024), but if you keep going, statsistics prove you will get there.

Ask not what a TV company can do for you, but what you can do for your company.   This is going to sound a bit harsh, but the people who run production companies don't care about the film you just shot with your mates on your new 4k Blackmagic camera.  At the beginning of your career companies are looking to see how you can help with their production, not the other way round.  Don't get me wrong, later on they may be very happy that you have aquired a few shooting or directing skills, but when it is your first job, chances are these are not the skills they are looking for.  


Use your skills.  If you are applying for a job as a Runner / Camera Assistant / Production Assistant, everyone who is applying has an education,is willing to work hard and probably has a good CV, so how do you stand out?  

Think of any skills that you have, that other people probably don't and think how you can use those in the TV world.  For example:  You have degree in Science, apply to Science based television programmes.  If you are interested in History, then apply to Historical programmes.  These kinds of programmes always need researchers and you could be useful to them.  If you speak a foreign language then find a show that needs translators or interpretors.  Having a language is a MASSIVE advantage.  TV programmes are shot all over the world, pre-production and planning these shoots may require your language skills, the crew on the ground might need your help, or they may need help translating the footage when it comes back.  If you are good with numbers and like sport, use your skills to work out the stats for football games.  If you are interested in politics, look at getting a job in current affairs.  If you like fashion/sport/gardening/achtecture - whatever, and you know a bit about the people involved in this world, then you could be of use to a production. This list could go on forever, but you get the idea.  Whatever skills interests or education you have, you can put them to good use somewhere. You don't have to stay in these jobs forever, but it could be a good way to get your foot in the door.

Be tenacious. When I was first looking for work in TV I sent of hundreds of CVs, literally hundreds.  This was in the days when people sent CVs by post.  I once even sent a CV inside a metal chicken through the post to a comedy channel, just to get noticed.  Did this get me a job?  No, but I still kept going.  In the end I walked round countless companies and knocked on doors pretending I had interviews with heads of departments, and the odd production company owner.   I didn't always get past security. I just kept going, untill eventually I had several offers on the table.

Here is an example of someone both being tenacious, and using her skills.  There was a girl I knew who wanted to get involved in TV journalism.   She saw a live BBC report from the town in Yemen where she was from (She lived in London).  She figured out that the crew would eat in a certain restaurant in that town, as it was a small place with few options.  She phoned up that restaurant and asked if a bunch of foreigners were eating there.  She asked to speak to the BBC crew and offered her services, she explained she knew the language, knew the region, and could help them out free of charge.  She ended up with a paid job at the BBC.

Use your contacts.  That old saying of "it's not what you know, it's who you know" is very true in TV.  If you know anyone in film or TV, keep in touch with them.  You don't need to hound them for a job, but get them to keep an eye out for you, that way if a job comes up in their company, you'll be the first to know.

Practicalities.   If you are wondering where to start, get a list of all of the production companies / post production companies / broadcasters or facilities houses in your area, depending on what type of work you are interested in.  Start by contacting these people.  There are lots of lists out there of production companies, databases like The Knowledge or Pact are a couple of UK examples.  Many of the larger organisations share CV libraries, rather than accept a CV as an email.  Upload your CV onto these databases, it is usually free and it is a good way of many getting access to several TV companies.  The talent manager is a UK example, and there are many others.  Keep an eye on Twitter and Facebook as there are many groups that advertise jobs in this way.

There are essentially two ways to go about contacting people directly to break into the industry:

1) Carpet bombing.  Get the general emails (info@ jobs @...) of every production company that is in your area and email them.  Chances are, most emails won't even be read, and many CVs will just find there way into the junk folder.  However, it is still worth while as some of those people might need someone, or they may pass you CV to the right person.  Remember, the larger the company, the more fortress like their email policy will be towards unsolicited mail.

2) Targeted shots.  This is more time consuming, but could give a better result.  Find a production company you are interested in, and then find out the contact details of the relevant people. Sending emails to addresses like"info" "CV" or "contact" usually means that your mail will be read by the office junior, who is not in a position to hire you.  You need to find out the contact details of the people that can hire you, this means a Production Manager, Production Coordinator, a Producer/Director or similar.   The trick here is to strike a balance between being motivated and determined to land your CV on the right persons computer, and pestering them.

No one wants to send off loads of CVs or enter their details into website it is boring, monotonous work that at times can feel soul destroying, however, it is a necessary evil in the early days of your career.  In order to get through it, split the list up and make a few goals.  Maybe decide to do twenty carpet bomb style emails per day, and two targeted emails. 

If you want to be really targeted you can even read up on what is about to go into production.  Online trade magazines often give information on programmes that have just been commissioned, and that means that the Production Company will most likely be about to crew up.

Get Connected:  Connect to your industry through any means possible: follow people on twitter, Instagram, Facebook, read blogs, comment on them.  Companies do this as they know people who are connected to them through social media are more likely to buy their product.  It is the same for individuals.  Someone is more likely to hire you if they have already had some form of contact through you on line.

Another example of this, just to prove I am not just pontificating and making all this stuff up, comes from Twitter.  Rodney Charters, a top Hollywood Cinematographer who is very open to social media, mentioned he was about to shoot in Austria.  Nino Leitner a young DoP from Austraia who is very well known online offered to assist him on twitter.  Rodney Charters gave him the job.  I don't know for sure, but I would say it was fairly unlikely they had ever met before this, and  the whole interaction happened solely through Twitter.  Would this have happened simply through sending an unsolicited email with a CV?  No way.  Incidentally, both of these people are well worth following on Twitter @ninoleitner @Rodneykiwi 


Film and TV is a tough industry to get work in when you are starting out, but it is a big industry that needs a lot of fresh talent to drive it along,  if you are really keen to work in it, you will get there in the end.


Canon C300 Zacuto Z finder

My one complaint about the Canon C300 has always been with the view-finder.  The LCD screen works great inside, or outside in shady conditions, but when you have the camera on your shoulder and you are filming with the sun behind your back, it is really tricky to see the screen.  You can of course chose to use to use an external EVF.  I just can't be bothered to deal with an evf for a few reasons:

1) Not all of the features from the camera always make it over to the EVF e.g digital zoom, peaking, zebras etc.

2) I can't be dealing with another set of batteries to charge.  This might be okay if you are running everything of one large v-lock - otherwise, too much hassle.

The odd solution to this has become available with a hoodloop type set up, but they usually have one problem or another: too heavy, too cumbersome, insainly expensive ...

Then there is my other issue with using on-board LCD as a view-finder.  If you are shooting off the shoulder for any length of time you are going to get extreme neck ache.  I speak from experience.  Look at where the LCD sits compared to the camera, it is way higher than your eyes, so you are going to constantly have your head pointing up straining your neck!


alt 
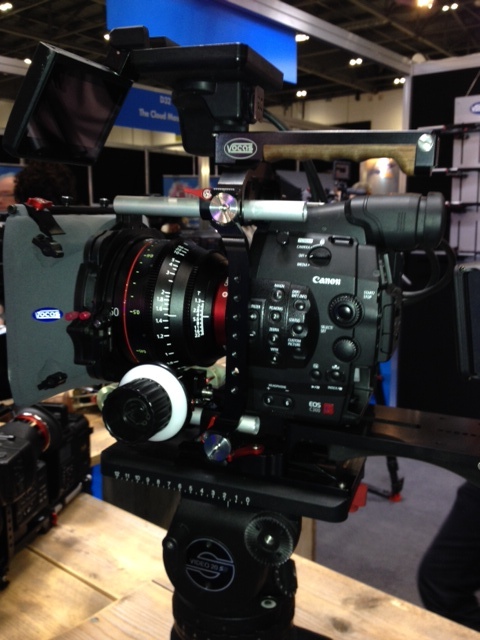
This is the top handle that Vocas have made for the C300.  There are lots that is good about this thing.  Most importantly it takes weight off the light weight plastic handle that has ONE screw hole!  If you load your C300 up with shoulder rigs, lenses etc etc as we all do, you just know that this screw thread is going to break at some point.  With this Vocas set up the  handle is fixed to a plate at the base of the camera, so no strain is on that thread.  

 But, and it is a big but, this still doesn't do much for the issue of the positioning of the LCD to the operators eye. 

However,  at last it looks like the guys at Zacuto have got a solution to both of these problems.   Not only have they made an Z-finder style device that fits over the LCD, they have also figured out a new configuration that looks like it will put the LCD where the operators eye is.  I can't say for sure if this actually works well, as I have only seen a video of this, and haven't been able to try it out yet, but so far it looks good. 


I will try one of these z-finders out as soon as I can and report back.

Update.  Since this was written Zacuto also now have the new Gratical Eye, which is another solution to this problem.  Read more here and check out my video review.

Sony F5 vs F55 vs Canon C300 vs Arri Amira

Arri recently released the pricing structure for the Amira, so it seems like a good time to look at a price comparison between the brands.


Since there is a price difference in terms of what you get with each camera in terms of extras, for the sake of simplicity, here is a rough price comparision for each camera. In each case it includes the camera body and a view finder (if not included in the original price).  All prices in US dollars.


Camera Price in USD
Arri Amira 40k/45k/52k
Sony F55  34k
Canon C500  20k
 Sony F5  17k
 Canon C300  14k

(see note on bottom of page of how I got this pricing)


I think that the price difference between each of these cameras would also continue to grow as you add on the extras.  Arri are not known for making cheap products, (think about the prices of the matte boxes).  For each camera you are going to need to add on some kind of shoulder mount system, batteries, chargers etc etc and all of these things will widen that price gap a little.


I think most cameramen, myself included, would feel pretty excited about shooting everything they do on a camera that shares the same chip as the Alexa (all be it with a different recording format behind it, which could change the look of the picture).  The question is going to be about the return on investment, whether the additional price you would pay for the Amira over the Sony or Canon cameras, equates to working on better projects, or earning more money renting the camera out.


The next thing to contend with is the current obsession with resolution.  Even people who don't work in TV come and look at my C300 and say "ooh does it shoot 4k", no and nor does the Arri Alexa that Roger Deakins used to shoot Skyfall or countless other beautiful looking films.  At present, production companies aren't even close to working in 4k, but Sony is pushing 4k TVs hard and so I guess it is only a question of time.  I can imagine that TV editing could become used to using 4k as away of croping the picture as and when they feel like it, and for the cameraman it would be like have a digital 2x extender on the camera at all times, but broadcasting in 4k seems a long way away.


When the C300 was first announced I jumped on it and put an order in, as it filled a hole in the market and there was literally nothing else out there I felt I could use that would give me the same results for that price.  In the current situation, I don't feel like I will run out a buy an Amira when they are eventually released.  I am more likely to be dictated to by the demands of production companies: if I start getting a lot of requests for F5, F55 or the Amira, then that is the route I'll take.


For further reading here are brief reviews of each of the cameras

Arri Amira

Sony F55 / 5

Canon C300 


NB: Here is how I got the pricing for the above table:

Arri have announced that the Amira will have 3 price structures, each one slightly different in terms of slow motion capabilities and recording formats.  

40k USD, 45k USD, 52k USD

In the UK CVP have announced the entry level package at 26,000 Euros, which is actually 5k USD cheaper than the US list price.  Since cameras are never more expensive in the US than Europe I would guess that the package prices are slightly off, or that the US price announcement includes more optional extras.  The 26k package from CVP does include a viewfinder, but not a shoulder mount plate.

Sony F55: 29k USD (body only) + 5k for OLED viewfinder = 34k USD

Sony F5:  16,490 USD (body only) + 5k for OLED viewfinder = 16,990 USD

Canon C500: 20k USD

Canon C300: 14k USD

How to find work as a cameraman

Since I wrote a blog post about "how to become a cameraman" it has become one of the more popular articles on the site, so the next question is "how do I find work as a cameraman?".   The short answer is that it isn't easy when you start out and a freelance career can take a good while, at least a year, to build.  The problem is, everyone is looking for the most experienced cameraman they can find, so how do you get that experience when starting out?  There are a few different options you can try when looking for work.


1) On line.  There are plenty of website that advertise jobs for the film and TV industry as well as Facebook groups etc some of these are free to join, others not.  Many of these sites work better for APs PDs etc than for camera crew.  The main reason for this is that most of those jobs will last several months, whereas a cameraman may only be needed for a week or even just a day, so companies a tend not to go to all the effort of advertising for such short job.  Having said that, longer jobs, such as working on long running reality shows, are occasionally advertised on line.  Full time work at production companies, facilities houses and broadcasters are also advertised in this way.  


2) Diary Agencies.  Diary services offer to look after your bookings, take phone calls for you if you are busy shooting and can arrange your diary.  They can also put you forward for jobs when offers come in from production companies.   When joining an agency it is worth having a look at the other cameramen on their books, if they are all much more experienced than you, then you know those people are likely to be picked for work over you.  The key is to join an agency that has people with a similar level of experience to you.  Some agencies might specialise in documentaries, films, dramas and so on, so it is worth looking at lots of agencies to get the right match for your skill set.  The main issue with diary services is the expense, most companies charge 100 - 200 GBP per month in the UK, and there is no guarantee they will be able to get you any work. However, if you think your experience is similar to others that are well represented by an agency, it might be worth taking a punt, you could spend over a grand for a years fees, but just one good job offer could take care of that cost.


3) Word of mouth.  By far the best way to get jobs is words of mouth.  The TV industry is built around trust, if a director is about to go to Alsaska with a cameraman, he or she needs someone who shoots great pictures, is reliable and that will be easy to get along with.  This last point is massively important, who wants to spend every waking minute with someone they can't stand?  Things like personality can't be judged from a CV, resume or profile on an online service.  In this situation a personal recommendation is going to carry much more weight than a CV from a stranger or even a recommendation from an agency.  So how to be that person who is recommended?  Firstly, on every job you do, do it well, be helpful and pro active, try to work above and beyond your actual remit as a cameraman.  Remember job recommendations could come from pretty much any of the crew, not just the PM or Director. Secondly, try to nurture any of those relationships you build on a shoot.  Keep in touch with those people either face to face, or through social media, whether that is Twitter, Facebook Linked in, or just though email.  The important thing is to keep these relationships going, you don't need to be hounding these people sending them CVs or Resumes, but you do need to keep in their thoughts so they don't forget you.  Drop Productions Managers, Co ordinatiors, Directors etc an occasional mail to stay in touch and who knows, at some point they'll be looking for someone and your name might be in their mind.


4) Give jobs away.  If someone offers you a job, but you are already booked, recommend another person you know.  Chances are they will return the favour.  You will also have made a Production Managers job a bit easier, and they will be grateful to you.


5) Persevere.  Work in the TV and film industry is oversubscribed, lots of people want these jobs.  No one just effortlessly works into a freelance career, it takes time to build skills, experience and relationships, however, in the end if you put the time and effort in, there is a good career there.

How to shoot reality or observational documentary

Even if you aren't working on a full blown reality TV show, there are many programmes that will incorporate a small amount of actuality shooting, where you can't control the action. Observational documentaries can be slightly tricky to shoot as there often isn't an interview or a graphic to cutaway to, so the cameraman needs to supply all of the buildings block necessary to make the edit themselves. The action often happens very quickly and there won't be time for a director to call the shots for you, often you'll have to do the thinking for yourself.

There is a lot to get through here, so I'm going to break it up into bullet points.

1) Audio is everything.  Audio is massively important when shooting reality and I would always advise wearing headphones, I usually do this in just one ear, leaving the other ear to hear what is happening around me. It is hard to stress just how important this is, if you aren't tuned in to the conversations the sound recordist is picking up, you won't be tuned in to what to shoot. Remember the edit producers will read through story notes and lots of the audio that is recorded, if they hear a vital conversation and want to cut it into the show, they won't be impressed if the camera is busy filming a pretty shot of the sun set. These days sound recordists will be laying audio down on a digital back up, so they'll be happy to monitor off their own rig, however, sometimes they will want to use your headphone jack, to monitor audio that they are sending to the camera. It is worth getting a solution to this, even if it is as simple as a mini jack splitter, so you can both monitor camera audio. The sound recordist could be picking up audio some distance from you through radio mics, you need to be able to respond to this as much as possible.

Observational and reality shows are all about the characters in them and what they say.  To film effectively you need to concentrate on what is being said, and respond to it.  The audio should always inform your shots.  Here is an imagined scenario to better illustrate this idea:

Dr: We ve had a look at your results...
Patient: How do they look?
Dr: Well, I was quite surprised at first
Patient: Why what is the matter?
Dr: You are pregnant.

So there are three possible ways to shoot this:
1) You shoot it all on a 2 shot and get everything that is being said.
2) You shoot everything in singles, quickly panning from one to the other.
3) You shoot the first line the Dr says and then only shoot the patient.


I would always advocate going with option 3 here, the reason for this is that you have the audio, you just need the reactions. At this point the main story is the patients reaction not the Doctors. The drama in the scene will all come from the patient, chances are, she will either burst into tears or be ecstatically happy. The Doctor on the other hand will be fairly non plused and we just need to hear his audio.

Option 1 will mean you capture everything, however, the editor might want to cutaway the middle lines as they don't add much. If you shoot everything on a 2 shot this will leave the editor with nothing to cut to. The shot will also be a hard profile of each person, as they will be talking face to face and this doesn't look great.

Option 2 sounds okay in practice, but the reality is you will be panning at the wrong time and miss the vital reaction. Remember it isn't just a case of wip panning, to have a decent full face shot, you will need to shuffle around and be to the side of one of the characters, if you are on the Dr when he says " you are pregnant" you'll be too slow to get the initial reaction.

Most scenes are not going to be as obvious as the one above, however, in most scene, there will be an element of drama. If you have been following the flow of what is happening between the characters, you should be able to guess where the interesting bits of drama and reaction will be. Remember, the sound recordist will pick up the audio, and the editor can even lay a wide shot over this if need be, the main thing is for you to get the reaction.

2) Fill in the gaps.

Most of what you shoot on an observatoinal show won't make it into the edit.  Part of the skill is in knowing what might be used. 

Let's imagine two people chat away for 10 minutes and you film singles of the conversation, switching between one person and the next.  Now let's imagine something dramatic happens that you know the Producer is going to like:  the subject cries/passes out/throws up/ whatever,  you now need to back track a bit and fill in the gaps.

Firstly, that conversation needs to be cut down to the essential points, and to do this the editor will need something to cut to. Non synch shots are always going to be a help.  Once you feel you've got all the drama you are going to get,  you can step back and get a big wide (wide enough so you can't make out what the characters are saying). Another alternative is to focus on some foreground and leave your characters out of focus.  Again, remember the first point: keep listening.  If the drama starts back up, you may want to get back in there.

So now you have your basic conversation with a few tights and wides.  Next you might want to pad out the story a bit, this isn't possible on every shoot and it depends on the people you are filming and the nature of the show.

Typically you will catch lots of "ends" a few "middles" but the beginnings of the story are often missing.You may need to back track and get them, think of a few shots that would help the story along. At the most simple level this could be one of the characters driving, arriving at a scene and getting out of the car. This is very basic but just these few shots might make enough space for an edit producer to write in a bit of commentary explaining what we are about to see.

It is also worth getting any cutaways which could be used to help the edit along. Think through the conversation you just heard and see what could be used.  Ask any edit producer on any reality show and ask them if they have enough cutaways, I bet they'll say no.

Reality and observational shows are becoming increasingly more structured, edging there way towards drama (Made in Chelsea and Made in Essex are at the extreme end of this). In these more structured shows, whole conversations can be re done, or gaps in the viewers knowledge filled in.  When you are working on a show you need to feel out just how much control you have.  If you are working on a show following the police around, you probably have very little control vs what you might have following a minor celebrity around.

If you were framing up or not recording over a vital bit of dialogue I don't see the problem in saying "what was that?" to encourage them to start over.  Equally, if you were following the police around and feel you needed a few more shots, once the action has died down, they may be happy to do a few driving shots, getting in and out of cars, etc etc.  All of this you have to feel out with person you are filming.  Once you have a decent relationship, it will make everything much easier.

3) Vary the shot size. Many inexperienced shooters make the mistake of shooting everything on a wide shot, standing very close to the contributors. This makes life easy for them, as cameras are easy to focus on a wide shot with a large depth of field and any shakes are much less noticeable, however, this is not good for the edit. For something to cut well the editor needs a massive variety of shots, tights, mids, wides and plenty of different angles. I always aim to give the editor a sequence that will work, where all the building blocks are in one place. If you only provide a wide shot, the editor is going to have to search through hours of footage to cobble together something that works. If you want to be hired again, it is important to provide usable footage. If possible, speak to the edit, find out what they typically need more of, or what kind of footage they don't want, that way you won't be wasting your time.

4) Talk to the edit. Another good way to get some communication between you and the edit suite is to talk your actions through. Let's say you are filming a situation, but the shot is not working, so you walk to a different place and shoot the same scene from a totally different vantage point, or maybe a new person turns up, but you didn't film them arriving. At times, the edit will have no idea of what you are filming or what just happened when you stopped recording. Filling the edit suite in with a bit of information might make their lives a lot easier. Just waving your hand in front of the lens giving a bit of information could help a lot eg: "I am filming this through the kitchen window as they don't want us in the house" or "that new guy who just turned up is a plain clothes cop".

5) Plan ahead.  Sometimes things just happen in reality or obs doc and you just have to follow the action as best you can.  In other situations, people know roughly what is going to happen before it happens.  In this situation you need to ask the characters who you are filming for as much info as you can get.  Here is an example of this.   I was filming an alligator that had been rescued, and was being returned to the Everglades.  I knew that it would make that cut as it was an end to the story.  I also knew that it was not the first time our character had returned an alligator to the wild, he knew a huge amount about the creatures and how they react.  Before I shot this scene I asked our contributor exactly where he would put the alligator and exactly what it would do once it was in the water (the answer was sink to the bottom and hide, whereas to be honest, I was expecting it to race off like a fish).  Just knowing these things meant there were no surprises for me, which in turn makes it easier to shoot.  Here is the end result if you are interested .


6) Shoot good GVs or B-roll.  If you are shooting a standard documentary over the course of say 10 days, GVs will often just be anything that looks interesting to give a sense of place. In the case of a reality show the filming schedule might go on for months on end, and you don't need the same few GVs again and again. So what should you shoot to make your GVs useful? In reality shows GVs are often used to give a wider sense of what is going on: what time of year is it, is it hot or cold, what kind of weather is it, what time of day is it. The trick is to give the edit suite a kind of tool box with all the shots they could ever need to build the edit.

Think of lines that could feasibly be used in commentary for the show you are working on: "It is early morning and ...." "Work has to stop at mid day as the searing desert heat ..." "Despite the rain...." Rather than just pretty shots, GVs or B- roll need to help the story along. A shot of heat haze on a road, blaring mid day sun or rain over flowing from a roof gutter might not be your traditional choices for a postcard style photo, but the editor will be grateful for them. Remember the viewer isn't as aware of the location as you are, so keep thinking, time of day, time of year and place.

If you can include some of the subject you are filming, then great. Imagine you are filming a show about police in New York: a shot of the police cars from low down showing snow and ice on the ground with the winter sun low on the horizon, could be more useful than a mid day shot of Brooklyn bridge (that, chances are, another cameraman has already done anyway). Reality shows typically run for months on end, so as winter sets in, story producers are bound to want to talk about this change.

7) Get the wides. Wide shots can often be forgotten about when shooting reality sequences, as typically shooters will be very close to the action, always scared to miss the next thing that might happen. There will usually be a lull in the action though, and this is the time to step back and get a massive wide. Wides help both to cut the scene together and to give a sense of place. If you can, get up high and look down on everyone, or falling that, try to move around to get a landmark in the background. If you are working on a large production with countless shooting APs sound recordists, PDs etc etc cluttering up your wide shot, get them to clear frame. You probably won't be very popular for doing this, as often people get carried away shooting everything that moves, however, wide shots are an essential part of an edit and as a good reality shooter you should make it your job to ensure these shots end up in the editors cutting bins.

8) Add some gloss. A lot of reality shooting is really about getting the shot, making sure you are in focus and pointing the camera in the right place when something interesting happens. Use any opportunity outside of is type of filming to add a bit of gloss to improve the production value. When the subjects you are filming are going about their day to day tasks try to show this in an unusual light. Look for reflections, silhouettes, extreme high or low angles, anything that can make the shot more attractive. Some shows I have worked on have given me helicopter time, four wheel drive cranes, massive jibs and others just a go pro, so the variety of shots you can provide is somewhat budget dependent. Whatever the budget, do the best with what you have been given. Getting onto the roof of a building to film a car pulling out of a drive way from over head, will give the show a more interesting look than an off the shoulder shot at ground level.  These shows can often run for months or even years, so adding variety will avoid repetition and hopefully add some beauty.

9) Trust the Producer. There will usually be a Producer, Director, Show Runner or similar person working on the show, who has a vast amount of knowledge when it comes to shooting reality or observational programmes.  In some cases these people might have spent their entire career working on such shows, trust their judgement and ask for advise.

Here is a story from personal experience: Early in my career as a cameraman I was working with a much more experienced producer. We working at an animal sanctuary. A woman came in to return a dog she said she had found on the street. To me this was the most mundane story imaginable, so I stopped recording. The producer insisted I keep going. It had been a long day, with the camera on my shoulder for most of it. I kept filming, all the while thinking it was a waste of time and effort. At some point in the proceedings the woman started crying, revealing it was actually her dog she was taking to the pound as she was no longer able to look after it. How did the producer know this? I don't know, she just did. Maybe it was women's intuition, maybe she noticed the woman was overly sad, or maybe she had worked on a million reality shows just like this one and knew when to keep shooting.

10) Get the shot. Don't be too precious about filming something in a considered and beautiful way, if you see something happening that you know will make a good story, shoot it. You might see something that is a bit far away, and handheld, on the long end of the lens, it won't be too stable, shoot it anyway. Sometimes you might need to run and the camera will be wobbling all over the place, shoot it anyway. These moments can be used to heighten the sense of drama and editors and producers sometimes like these shots as they move the show away from the more finessed shots and give the programme a kind of legitimacy, to prove this is a actually happening and we are just flies on the wall. We have all seen shots where the cameraman is asked to stop recording, so he just puts the camera on the floor and keeps rolling. We are just looking at a set of feet, and hearing the audio, but it gets used. Obviously I am not suggesting shooting everything in this way, but if it is a bad shot or nothing, then get the shot, it won't reflect badly on you.

11) Know your kit. Knowing your kit inside out will help you with the above (getting the shot). It is essential to be able to react quickly when shooting reality or obs doc. Knowing where each button on the camera is by feel, without looking, will help here. The characters you are following might go from an extremely bright place, into a dark room in a second and you need to be able to get rid off lots of ND and crank up the DB or ISO very quickly. Most cameras have assignable buttons on the side, so if you are likely to need a certain feature, assign it to a button for easy access.

When I am shooting something very fast paced, I like to shoot in the middle of the iris wheel (around f8), that way I can change exposure smoothly if the lighting changes. If you are shooting at f2.8 and then your characters move into the shade or the sun goes behind a cloud, you won't be able to open up anymore and you'll have to remove ND which will ruin the shot with a sudden exposure jump. Again, this is just a tip for shooting when things are fast paced, I won't shoot everything at f8 as it could start to look a bit flat and dull. When things slow down or you know you'll be in one place for a bit, open up and shoot with a smaller depth of field.

If you are shooting on a camera with an internal iris (C300, FS7 etc) try not to continually change iris.  Having a perfectly exposed shot, is not much use if you've just suddenly jumped a stop whilst recording.  Better to have a shot that is a stop or two under exposed, than for your shot to be covered with visible iris changes.


There are several features on a camera that you might want to use occasionally and could assign to a button. The pre record function can be a useful tool, hit record and the camera will record, plus it will put down everything that occurred several seconds before the camera went into record mode. I often assign this function to a button, that way say you are waiting for a convoy of trucks to role around the corner in the distance, rather than roll hours of footage of an empty road, waiting for the moment, you can just wait till you see the trucks, then hit record and you will have the shot of them first rounding the corner. Slow motion is another useful tool, but you really need to make sure the programme you are working on will use slow mo. Usually slow motion is tucked away in a cameras menu system, if you think you'll need it, assign it.

12) Know the law. This really only applies to observational documentary, less so reality and entertainment shows. In many situations you could be asked to stop filming and laws exist to protect people's privacy. Knowing these laws will help you out, so you know when to ignore the request and carry on discretely, and when you should stop pointing the camera at them (and potentially just leave the camera rolling to pick up audio). Laws change from country to country, and in the USA from state to state. In some states it may be legal to stand on the street and film through the window of someone's house, in others it may not. Knowing what you are legally allowed to do will give you confidence in what you are doing and stop the production from getting involved in any legal wrangles.

13) Get black and white. One of the most experienced series producers I have ever worked for once said "life is grey, we want black and white."

What he meant by this is that real life is much more complicated than simple good or bad, black or white. Are the choices that characters make in the show right or wrong? The truth is often that these choices have both good points and bad points (a kind of grey). However, for the sake of a reality TV show, we need drama, and for that we need a dichotomous world of good/bad black/white. The story arc of most reality shows will go from boom to bust and back again and it is worth keeping this arc in mind when shooting.

If you see a worried looking face, tension, anger, tears, fights, rejoicing, happiness, relief, joy, these are all things that will add to the drama of the show and give the producers what they need: black and white.

14) Keep up your stamina. The last point to make here is a simple one: reality shows are marathons, not spirits. Hours and hours of your footage will end up on the cutting room floor, so it can be tempting to shoot in a half-arsed way when you are tired out, however, Sod's law will dictate that that poorly shot bit of footage will make the cut. Keep your strength up and keep shooting to the best of your ability.  To do this you need to look after yourself, eat well, drink water and rest when you can.

What type of lighting to use for video

All cameramen need some kind of basic lighting set up, all offer different pros and cons at different price points. Here is a quick round up of the differrent set ups available.


1) Tungsten:  

 alt

Pros: Cheap, powerful, high quality light source


Cons: Heavy, hot, not always dimable


These lights have been around for a long time, the advantage of this is that they are therefore often really cheap.  You can buy a set of three lights incredibly cheaply as many cameramen are moving towards more modern lights such as LED.  Another advantage of these lights is the power: an 850 watt red head has a hell of a lot more power than an LED light panel.  This extra power can also work against you as theses lights are usually not dimable, so you have to get around this with huge amounts of diffusion paper, or by bouncing the light off something.  There is also the option of buying lower wattage tungsten lights if you know you won't need the excess power.  Another plus for tungsten is the quality of the light.  A simple tungsten bulb is a much more reliable source of light than an LED light as it transmits the full spectrum of light. You can read more on this here.  The light from these lamps is typically very hard, this however is often useful, and if you need a softer light source, a Chimera soft box or some diffusion and a bit of distance will soften it. And now for a few disadvantages.  Tungsten lights are incredibly inefficient, meaning they get really hot.  Several of these beasts burning away for hours and you'll have a hot room, you also have to let them cool before packing them as if you touch them, you'll realise they are hotter than the surface of the sun.  The next disadvantage is the size and weight.  For the most part this doesn't bother me, but if you are going to fly or travel a lot with you kit, it could become a pain.


LED

 alt

Pros: Lightweight, bi colour, battery powered, efficient, dimable


Cons: Poor quality light source, not powerful 


LEDs have flooded the market in the past few years.  The technology behind these is constantly and rapidly improving, so I am sure they will be the main light for everything before long, however, as it stands there are some limitations, but first a few of the good points.  Having the option to battery power is a massive plus.  Many important buildings will want to see PAT certificates before you are allowed to plug them into the wall, and some are so paranoid they won't allow anything to be plugged in (St Pauls Cathedral in London is one such place that springs to mind).  Battery power allows you to get around this.  Another plus to battery power is, it saves time finding power points and running cable, in a quick turn around job, this can be invaluable.  Being able to switch between a tungsten and daylight colour temperature and everything in between is fantastic, and a great time saver, as no gels or blub switching is needed.   Not all LED panels are bi colour, so you need to check you have this function before buying.   There are certain situations where no other light will do, for example a shot where you need to light on the move is really easy with an LED panel, someone can just walk holding the panel where you need it.  Try this with a red head and a load if cable and you are likely to get in a mess.  So why not shoot everything with LED?  LED have a few limitations, firstly the light source just isn't high quality as mentioned before.  LED light panels never really look that great as a key light source for an interview as the light just doesn't wrap around the face as nicely as something like a kino flow, attaching a chimera soft box can help limit this issue, but it doesn't solve it.  The next issue is power.  If you are in a bright room and you need to battle against the daylight an LED panel just won't cut it.


Fluorescent

alt 

Pros: Quality light source, dimable, low heat


Cons: bulbs must be switched for colour change


The kino flo is my go to light for so many situations, especially interviews, and has been for years.  The light is dimable and really wraps nices around the face so you don't get any harsh shaddows.  The ability to switch from tungsten to daylight colour bulbs is great, although obviously not as convenient as LED bi-colour switching.  The units are fairly light weight and transportable.  I have been using a kino flo diva light for many years, flying it all over the world and it is still running well with almost no issues since I bought it.  Bulbs last a long time, and the unit doesn't overheat. Price wise these do cost more that the other two options above, but you do get a good quality light.


how to make money as a freelancer

As freelancers, most of us got into this line of work for the love of it, and as such many of us aren't so good at the business side of things (I include myself here).


One of the things you just have to get into the habit of is, talking money.  When I first started, Production Managers would call me up and ask me to do so many hours and bring so much kit, for a certain amount of money, and I'd say yes to everything without thinking, and then suddenly end up on a job with a bad rate.  There is nothing worse than a disgruntled employee, the person that moans about the rate or how long the day is, don't be this person.  The rule I use for myself is to only agree to jobs where I am happy with the rate, or where it is at least acceptable, and once I have accepted it, no moaning.  If it is way below my rate, I don't take the job.  When you first start out as a freelancer, this is a hard thing to get the hang of, but trust me here, it is a worth while strategy.  You might think to yourself you have had a quiet week, or you could use the money and you think: it is better to earn a low rate than sit at home an earn nothing.  However, this is a bad stratergy for making a living as a freelancer, here are a few reasons why:


1)  Working for a low rate marks you out as a freelancer of a certain standard, this is probably unfair, but it is the way it is.  If you could buy a Rolex for five bucks, would you still consider it a quality product?


2)  If you work for a low rate for a production company, when they get a higher budget production, they will typically spend that cash on a more expensive person who they deem to be of a higher quality. You will forever be stuck at that level of the person who will do the job on the cheap.


3) Accepting a low rate for one job lets the production company know the lowest rate you will be prepared to go to, with this in mind, they can offer you this rate for every job they get.


4) Working for a low rate will make you a less happy worker.  If you think you are being ripped off, you will be less inclined to go the extra mile, you may start to moan about extra hours or the conditions etc etc.  The production are less likely to want to work again with you in the future, as no one likes to work with a miserable freelancer.


5) Sod's law :  The law of the freelancer is simple, once you have accepted a job with a low rate, a much better job with a higher rate will come along.  You are then left with the difficult task of worming your way out of the first booking or honoring it and turning down a potentially lucrative or more interesting job.


6) The final point to think about is why you became a freelancer, for me it is to do rewarding, interesting jobs at a fair rate. If I am not achieving that, then I might as well go and earn money doing something else.


With that established, how do you get a decent wage, when your client will usually want to haggle down your rate? Firstly, this is something you learn with experience, I am still not great at it, but it is good to bare the following in mind.


1) Have your rates in your head.  Often people will call up with questions, soon enough they'll ask how much for a day a week, a ten hour, a 12 hour or asking if you can do a half day rate, how much is your kit, do you charge for your car/van etc.  It is good to have answers to these questions in your head.  


2) If it gets too complicated on the phone, and people are asking for various extras and bits of kit, buy yourself some time and email them a quote.  You never want to agree to something on the phone that you haven't fully thought through.


3) Have a few reasons in your mind as to why it costs what is costs.  For example, a production manager wants you to film something from a helicopter, but says they have someone who will do it on their iphone for a free lunch and a pat on the back, you need to respond to this saying you cost more as you have X number of years filming experience, have shot from helicopters many times and own a camera that gives better results than a phone.  Clients are often happy to pay the extra, but need to know they are not being ripped off.


4) Have a rate in mind that is the lowest you are prepared to go to and stick to it.  Low rate jobs just aren't worth the hassle for the most part.  If the rate is low, it usually means the day is overly packed with work, that lunch breaks are missed and that there isn't enough time to produce a quality piece of work.


This last point is the most important for me.  As a freelancer I want to turn up and produce something that is of the best quality it can be.  I want to be happy with the work, and I want the client to like it enough to hire me again.  If the budget isn't there to pay me a decent wage, chances are the over all budget isn't enough to create a quality product.


leica r lenses for video

I have been obsessing about Leica r glass and the "Leica look" for a while now.

There are a few reasons for this: firstly, as far as stills camera lenses go, Leicas are built very well.  You have a large focus throw, the iris is controllable from the lens, which you can always have declicked for smooth iris changes mid shot.  Altogether these things make vintage lenses much more practical for shooting video.

There are lots of old "vintage" lenses that have these features though, so why Leica? (I have previously written about lenses with iris control   and zoom lenses with iris control including modern and vintage options.)

I was looking for top notch optics, something that would compete in sharpness and definition with modern lenses such as Canon's L series lenses, but that were in solid metal housings with large focus throws and iris control.  I was also after something that had a slightly different look from everything else out there.  

After looking at loads of photos I narrowed it down to two that I really liked Zeiss and Leica.    NB I find it way easier and more enjoyable to look at photos or screen grabs rather than video.  Videos take ages to find, most of them aren't particularly well shot, or show off the lenses very well. (that said I put in some serious searching later, and found some amazing videos below)

In the end I decided to go with Leica.

There was something slightly different about a lot of the Leica photos, a soft creaminess to the background that I really liked.  Reading on forums it can get a bit heated, people are so into a certain type of lens, but I guess in the end it comes down to a personal preference.

There were a few photos that really stood out to me as having a fantastic look to them.  I found these photos on camera forums and the photographers have kindly allowed me to publish them here. 

I picked these shots as they all have very simple subject matter, nothing flashy that has been achieved by clever lighting: the beauty in these shots is all down to the lens.

alt

Photographer: Sebboh, San Francisco flickr

alt

Photographer: Tri Tran

alt

Photographer: Tri Tran

It is hard to say why I like these shots, but I think part of it has something to do with the other worldly quality to the out of focus bokeh.  Although the above shots are very simple scenes, they almost look like paintings.  Talking about lens coatings or the number of aperture blades and the effect this has on the shape out of focus part of an image, is probably a step to far in lens tech for me, so I'll just stop there, it is enough for me just to say I like it. 

Since this is a film and TV blog, not a photography forum, I put in some time and found some fantastic videos showing what you can get with Leica glass.

Here is a Leica R video that really stood out for me as it shows what the glass can do.

There is another video here using the Epic-X with Leica R.  I think these lenses really shine when they are opened up and are close focusing so there is lots of out of focus highlights in the background.  There is something so magical about these shots and it is so simple, just a few potrait shots, but it really looks beautiful.

{vimeo}33996944{/vimeo}

The video below is shot on the RED Epic MX with Leica Rs and is from Adriaan Kirchner

So many people are out there shooting away on Sonys, REDs, Canons, DSLRs etc often with modern Canon lenses and I am hoping to get a slightly different look from the Leicas in order to break away from the crowd just a little, so we'll see how it goes.  

Matthew Dulcos at Dulcos lenses has a lot of good things to say about Leica, as does Shane Hurlbut and these are two guys who know a hell of a lot about glass, so I don't feel like I am going out on a limb here.

So anyway, after much geeky obsessing, I bought my first Leica the Summicron 35mm R f2.  I love the field of vision of a 35mm lens on a super 35mm chip, so I thought I'd see how I get on with the Leica, and if I like it, I may well buy a set.  (Update, of course I loved it and ended up buying  small set of Leica Summicrons)

alt


Leica do several different ranges and the names indicate how fast they are.  As you would imagine, the faster the lens, the more expensive.

  • Noctilux         .95f & 1.2f 
  • Summilux      1.4f
  • Summicron    2f
  • Sumarit         2.5f
  • Elmarit          2.8f
  • Elmar            3.5f

I would love to own a 50mm Noctilux, but they don't come in an R mount (only an M), and they are very expensive.

I decided to go with the Summicrons as they give a great image that is very highly rated by many photographers and cinemataographers. I find a rarely open up more than 2.0f, any more than that and it is very tricky to keep anything in focus.

Ken Rockwell describes the 50 Summicron on his blog:

"Leica has made the superb LEICA SUMMICRON 50mm f/2 lens in several iterations since 1953. It has always been the reference against which the rest of the world judges lenses."

Thorsten Overgaard, who has some stunning Leica photography on his site (mainly on the Leica M lenses) has this to say:

"In the 50mm range the worlds best 50mm standard lens, the Leica 50mm Summicron-R f/2.0 (no 11 215) was designed by Dr. Walter Mandler in 1976 and produced untill 2009."

The Leica R lenses can easily be adapted to work on Canon EOS cameras like my C300, so I bought a Leitax adapter.  You can pick up adapters for next to nothing on Ebay, often shipped in from China, but I figured there is no point spending out on a decent lens to put on a decent camera, only for a cheap adapter to mess up your focus.  Leitax are generally recommended by anyone interested in Leica lenses, they are not the cheapest, in fact they are probably the most expensive, but you are paying for quality from a highly regarded and very knowledgeable manufacturer.  The service is great, and I would thoroughly recommend them.  

The thickness of the metal adapter is hugely important.  A fraction of a mil out and your lens won't focus to infinity or it will push past it.  Any loseness in the connection from the camera and lens will obviously create focus issues.  These things aren't worth the risk to me, so I reckon its best to go with the Leitax if you can afford too.

As soon as I got the adapter I was keen to try out my lens, firstly on my stills camera, just taking a few snaps.  My first impression, I love it.  The lens has a decent heft to it, in its all metal housing. I reckon you could probably drop it and little would happen to the lens.  The focus throw is very large, if you are used to modern stills lenses, and also very smooth.  There is lots I love about the lens, the in-built metal hood means no more messing about screwing plastic lens hoods on when it is sunny.  Unlike all my other lenses, this hard stops at infinity, at last, no more missing infinity on a pull focus and then having to back track and re take the shot.  Another great feature is the close focusing distance of 30cm or 11.8 inches.

Something that Matthew Duclos mentions on the SALT test is that the image can wobble when pulling focus on a modern stills lens.  This isn't something I had noticed or even thought about before, but he has a good point.  The reason for this wobble is modern stills lenses are designed primarily for auto focus.  This means the barrel has to be very light, so it can easily be moved by the auto focus motors.  The lightness and ease of play can cause issues over time with the lens.  Older lenses, which don't have auto focus, are much more solid, and don't suffer from this issue.  I think for the most part this wobble is so small you can probabaly get away with it, but if you were blowing up something for the cinema screen, you might get caught out.  I guess shooting something very tight that was being shown on a massive 60 inch TV screen might also give you a problem.  The solution is to pay big bucks for Cine lenses, or just get some vintage still glass.

I had a quick play around taking some pictures on the Leica and then switching over to a modern Canon lens.  I am not going to put the photos up here, as it was an incredibly unscientific test, but maybe I'll do something at a later date.  There was discernable difference between the lenses.  The canon was slightly more vivid and slightly more contrasty, the reds particularly popped out.  The Leica had a slightly muted look, less glossy almost.  Strangely the Leica seemed to handle the highlights in the skintones slightly better too,  but that is probably a bit too much to comment on for such an unscientific test.  However, these initial impressions are pretty encouraging and I can't wait to take the lens out on its first job.   I am looking forward to playing around with the lens a bit more, so I can test out the bokeh, particularly on the highlights, as this is what got me interested in the first place.  

Update.  This is a frame grab from my C300 markii with my Leica R 35mm cron.  This lens flares like crazy, but I really love it for that.  I'll often get rid of the hood and really let this thing flare, as is the shot below.  

leica R on Canon C300 mkii

If you want to get any vintage stills lenses modifed for video there are a couple of places to go to.  If you are in the US check out the Cinemod from Duclos Lenses.  If you are in the UK, go to TLS - True Lens Services for their Cine Shot mod.  The cine adaption process is fantastic.  Firstly, the iris is de-clicked, giving you smooth iris control. Lens back are added for your camera type.  The front of the lens can be modified so you can screw on standard 77mm filters, and easily attach a matte box.  Both companies can also add a fixed lens gear for your follow focus.  

Despite having great optics, there are a few small issues with the Leica housing in my opinion.  Firstly, the lens caps.  These can very easily be knocked off and lost.  A Cine mod replaces this issue by adding a wider front with an 80mm cap.

The second minor problem is the stranage-sized filter threads.  I always put on a screw on UV filter over all of my lenses, mainly just to protect the front element.  Also if you aren't using a matte box, you may want to screw on polarisers etc.  Leica lenses are not usually the standard 77mm and even if they are, the pitch size is not standard, so you are very unlikely to find a filer or screw on lens hood that fits.

Both Duclos and TLS get around this by attaching their own front to the lens.

This is the Duclos Leica 35 with Cine mod

Below is the TLS version of Cine shot

I spoke to Colin at TLS in the UK.  Immediately, I was impressed by just how much they can do at TLS.  They can modify almost anything you want to the specifications you choose.  If the part you want doesn't exist, they make it for you.

Here is my set of Leicas after the mod from TLS.  They can also do lens gears for these, but I don't use a follow focus much, so decided against them.  From Left to right 50mm, 35mm, 90mm all Summicron.

If you are still keen to see more, here are a couple more videos.  This first one really shows that softness I have been talking about.  Its somehow less contrasty than a lot of modern lenses.  I like the slightly muted colour palette too, this is of course something that could primarily be from the grade or the camera picture profile.  I have noticed that Leica lense tend to add to this slightly flat look.

I'll finish with this, shot with a Leica Noctilux f0.95 50mm lens on a RED Epic.  This was made by Tom Lowe (of Timescape fame)


Here are a few very simple shots with my Leica Summicron 50mm.  These are all just texture shots, where I wanted to see how the lens would look in the out of focus areas.  I have always enjoyed the buttery soft quality on these lenses.

leica r 50mm summicron

leica r 50mm summicron texture

leica r 50mm summicron texture

leica r 50mm summicron bokeh

Further reading:

There is a comparison between Ziess Canon and Leica on Shane Hurlbut's blog that is worth taking a look at.

There is also a very in depth comparission from Matthew Dulcos and others over at RED user.  This test looks at how still lenses perform: Canon, Leica, Zeiss and Nikon as well as the Tokina 11-16mm that Duclos re house.  There is also a couple of Angenieux DPs thrown in there to show the comparision between the cheaper stills glass against 20ks worth of Cine glass.

Also if you are feeling like a long read, check out the Leica R thread over at RED user.  There are several people pitching in with experiences with Leica R lenses on RED camaras, together with videos and pictures.  It is is a fantastic read for those with the Leica obsession and goes on for over a hundred pages!


what is the best 1 x 1 LED light panel for video

There are an absolutely huge number of companies supplying 1ft x 1ft LED light panels for video, so which one is best?  


Firstly, light panels can be daylight only, tungsten only, or bi-colour (which allows switching between the two).  These all vary in price, but since we need to compaire apples with apples I'll only look at the more expensive bi-colour variety.  Also, LED panels often come with different power options, so in each case I have picked the more expensive, more powerful option to keep things even.

alt

Before we get started here, the cheapest option is not always the best as the colour quality varies massively.  The reason for this is the way the LED are actually made (if you want to know more about this and how LEDs effect skin tone etc this is an article I wrote based on Arri's findings).  Some of the cheaper LED panels have such low quality LEDs that whatever your filming or photographing can take on a green tinge.  To my mind there is not much point paying out for a good camera and lens, only for the quality of the light to bring down your images.  I have heard of people using minus green gels to get around this issue, or just hoping to save the picture in the grade, however, you can't just grade or gel out a colour if the colour quality isn't there in the first place.  A decent quality light source fires the entire colour spectrum at an object, whereas a low quality light source has a very limited spectrum.  Again you can read more about how light source quality effects video cameras here.

alt 

For an LED panel to work well it needs to be able to put out a decent light source and a reasonable amount of brightness.  The quality of  light can be measured by CRI the colour rendering index.  This runs from 0 to 100, with 100 being the best (the sun is one example that would read as 100).  Here is a table where I have compared the CRI and price of various top LED brands.  I have used all of these brands (with the exception of F&V who I have only recently heard of).  However, these CRI rating are from the manufacturers and not from tests I have done.


model name CRI US price UK price  

Kinoflow celeb

95 5709.50

1976.47


Lite panel

90  2695.50


1781.33


Gekko karesslite 90+ ?

1798.80

 
Dedo Tecpro Felloni 84  1648.95

627

 
F&V 85 500

410 (euro)

 
F&V ultra colour 95  ? 1027.29 (euro)  


Despite what these numbers suggest I also think it is worth trying out these lights for yourself before buying if you can.  A couple of observations from me are that 1) I used the Gekko Karesslite and despite it having a good CRI, I thought it was a touch heavy to cart around and despite that extra weight, wasn't particularly bright.  2)  I have used the Dedo Felloni many times, I have always like the pictures I got with this, despite the relatively low CRI when compared to the top end of the market.  I must admit I put a bit of trust in Felloni as they are made my Dedolight and the BBC owns a tonne of them, and the engineers there do put the kit through some pretty serious testing before making an investment. 

There are huge numbers of LED 1 x 1 light manufacturers missing from this list, their prices are well below those on the above table, however, I would imagine the same would be true of the CRI ratings.  Only manufacturers with high CRI ratings tend to publish them.


Despite using lots of LED panels, and lots of internet research, the only brand that had a very high CRI with a suprising low price was F&V.  I have not used (or even seen) their kit, but am very keen too.


Update:  

A cool little add on for LED panels I used the other day was a soft box made by Chimera.  The great thing about this as it defuses the light really well and is very small and light weight, so packs down easily.  I find LEDs to be a little harsh, compared to something like a kino that wraps light around the face really well without shadows.  

LED soft box


Camera jib technique

Jibs come in a range of sizes from massive beasts that swing over thousands of heads at a concert to four foot mini jibs that one person can walk around with.  There are people that own Jimmy jibs with hot-heads and use them everyday at work, and can pull off amazing shots with them, however, this article is aimed at people using the kind of jib that is small enough to check in on a plane or put in the back of a car.  NB Some people refer to jibs as "cranes"  to my mind, a crane is something on a building site, or maybe a massive techno crane if you are on a big budget movie set, so for the purpose of this article we are talking about jibs.

alt

Typically, I'll only occasionally need to do a jib shot on a shoot, however, this summer I spent 6 weeks where I used a jib most days, so thought I'd write up a few tips on getting decent shots.


1) Recce your spot.  Jibs are massively time consuming compared to tripod shots, so choose your location carefully, you don't want to waste time setting up a shot only to decide it doesn't really work.  If you are unsure, take your camera over to the spot and just try out the move you want, so you at least get an idea of how it might work.


2) Set up your jib correctly.  You'll be looking at 2 bubbles here, one on top of the tripod and one on the end of the jib arm at the head.  Make sure the bubble on the head is still in the centre wherever you swing the jib arm, if your tripod bubble is off, the head bubble will change as the jib arm moves.  The next thing to check here is that everything is secured.  Since the camera is on the end of a long arm, any movement will be magnified, if the weights aren't tight and wobble slightly the camera will wobble a lot.  Next, the obvious bit, make sure the jib is perfectly balanced, the weight arm needs to be pulled out so it balances with the camera.  Once I have balanced a jib perfectly I tend to mark it with tape or a white pencil, so I know exactly where the balance point is, that way, next time I set the jib up I can go straight to that marked point. Remember different lenses, batteries and other attachments are going to change the balance point, so it is a good idea to keep the same kit on the camera if you want to set up quickly.


3) Work with 2 people.  There is a lot to concertrate on with a jib shot, you might be looking down at a monitor and not at the actual camera.  Having another person there will insure you don't swing the jib into that priceless chandelier or the clients head.


4) Start simply.  The shot you saw in that film that started in a room, went out the window and decended to ground level was done with a remotely operated hot head.  Chances are, if you are on a documentary shoot you won't have this.  If you haven't used jibs a lot, start by just locking of the head, no pans, not tilts and just use the jib arm to move up and down.


5) Try more complex moves.  Still keeping the head locked off, it is good to try swinging the jib arm whilst raising or lowering the boom at the same time.  This takes a little bit of practice, as it doesn't look good if one movement finishes before the other, i.e. if the camera has finished rising or lowering, but is still swinging left or right.  To get this right you need to make a diagonal movement and mark out a start and end point in your head.  For this kind of shot I find it works better if one person just looks at the monitor and the other concertrate purely on the swing, so he or she can concerntrate on that start and end position. 


6) Try even more complex moves.   Moving the head, tilting or paning, whilst simultaniously operating the jib arm is really tricky to get right, but can be worth while.  The jib will float around fairly effortlessly as it is balanced, whereas tripod heads tend to use lots of friction.  I find the best thing to do is to slacken the tension right down on the head, so if feels similar to the resistance from swinging the weight of the jib arm.  It is worth practicing the move a few times to make sure you can nail it.  This works particularly well if the shot is going to be ramped in post (as the speed will gloss over any mistakes in the middle of the move)


7) Shoot wide.  Anything other than a fairly wide shot will wobble.  Also, wider jib shots tend to look more dramatic.


8) Find some foreground.  If you jib up 10 ft with nothing in the foreground the move will be almost imperceptible, however, if a tree of a plant or a textured wall or whatever is just in front of the camera the move will appear huge.


9) Reveal things.  Starting with your shot totally obscured by an interesting object, or even just a wall or a plant, will make your shot more dramatic.  


10) Solar flares.  Playing around with solar flare will often get interesting results with a jib as the flare will change as the shot moves.  I often like to move towards or away from solar flare, that way the shot can start or end of total sunlight, which makes a good cutting point for the editor.


11) Use a bit of height.  With the tripod fully extended, and then the jib arm at full height on top of that, you can get some real height on a jib.  Sometimes this can be interesting in itself and you may not need to move at all.


12) Pace.  Moving the jib slowly from start to finish is going to be easier in terms of giving you a stable start and end shop without any abrupt wobbles, however, a slow shot isn't always what the editor wants.  In many cases they can just ramp the shot in post, however, this won't always work, for example if you have a flowing river, or people walking in shot then you need to get the pace right.  You'll probably have a fairly good idea about  whether the show your working on use fast or slow moves, but I typically offer the editor several different speed variations if I know it is a shot that cannot be ramped.


13) Trajectory.  This is a tricky one to explain.  If the tripod is at 90 degrees to where the camera is pointing, and you jib up, the movement is going to have a curve to it, if the tripod is directly behind where the camera is pointing the movement will be straight up and down.  This is something you can use to your advantage, for example you can track up the side of a tree and towards the end of the move the camera will move away from the tree to reveal a clean shot.

alt 

14) Monitor and check the take.  Sometimes I use a monitor when I shoot with the jib and sometimes I don't, it really depends on how difficult the shot is, however, I always check the move back after each jib shot.  It takes so much time and effort to lug a heavy jib about, spending a few seconds to re check the move is definitely worth it.  You are concentrating on lots of different things with a jib, so it is easy to miss something in the monitor (like at the end of the move you just caught your own reflection, or that bit of kit on the floor in the distance).  


15) 2 for 1.  Since jib shots take a while to set up, I usually have a look around and see if I can get a 2nd or 3rd shot from the same position, it isn't always possible, but it is a good idea if you are short on time.


Finally, here is a property show I worked on.  As you can see they love to use moving shots, anything where I used a jib, track tended to make it into the programme.

{vimeo}120459697{/vimeo}


DSLR Camera baseplate

Tom from Longhaul gear recently contacted me about a baseplate he made with funding help through the Kickstarter community, it is called the Multiplate.  I was immediately interested as Tom himself is a cameraman, so I knew the product would be designed with the DSLR shooter in mind. 

alt

The Multiplate screws to the bottom of the camera and has a large number of holes, allowing you to fix any kind of gadget you want to the baseplate.   When I used to shoot a lot of footage on the Canon 7d, I always viewed the image on a TV longic monitor, and invariably this would need to be mounted on the hot-shoe on top of the camera.  The problem is, the hot-shoe is useful for mounting other items, such as an LED top light or a radio mic receiver.  The Mulitplate helps you get around this problem.

alt

Holes are tapped all over the place on the Multiplate, I have screwed in a Noga arm with a monitor on the side here, but you can mount it anywhere you like.  


The Multiplate also has 15mm rods that can be screwed into the plate.  This is useful for a matte box or follow focus, I also found it useful to add redrock bars to.  I wouldn't want to shoot handheld all day with the bars mounted like this, but for a short period of time it is pretty good, and alot better that holding the camera body.

alt

If you need a simple, practicle way to add accessories on to your DSLR camera, this could be a good solution.  Further info and sales can be found at  Longhaulgear


Can the C300 be used on the stabilised Movi

If you have been keeping an eye on Twitter you will have seen an amazing amount of interest in the new camera stabilisation system MoVI from Freefly systems.  If you have no idea what I am on about, watch the video below.


When I first heard about the MoVi people were talking about payloads of around 5lbs,  this was on the MoVi M5, perfect for cameras such as DSLRs or the Blackmagic pocket camera, but the big question for me was: Can I put a C300 on this thing?  Since then Freefly have released the M10, which allows for weights of up to 5.4kg or 12lbs.  This is where things get really interesting as the M10 will hold the RED Epic the Scarlet, all the Canon C100, C300 and C500, Sony FS100 and FS700.

Firefly MoVI M10


According to the Freefly forum, the viewfinder does need to come off in order to pan fully up, but other than that the system seems to work fine.  

Kevin Ritchie posted this clip on Twitter the other day of a C500 mounted to a Movi system, which is good to see proof, that it definitely works.

Price wise the MoVI M10 is selling for 15,000 USD.  Needless to say, I want one.

Update:  I have used the Movi M10 with the C300 and it works really well.  You have to remove the handle and there are a few other adjustments to get it working well, but it makes for a great rig.  Read more about it here.

miller tripods review

Unusually, I recently took two tripods away on a shoot, the Miller Arrow and the Miller DS20, I used them both every day for a total of 6 weeks on several episodes of a series called Extreme Homes.  Since the tripods took an absolute beating in terms of use and travel, I thought I'd write up a review.


alt


So first of all, why two tripods?  

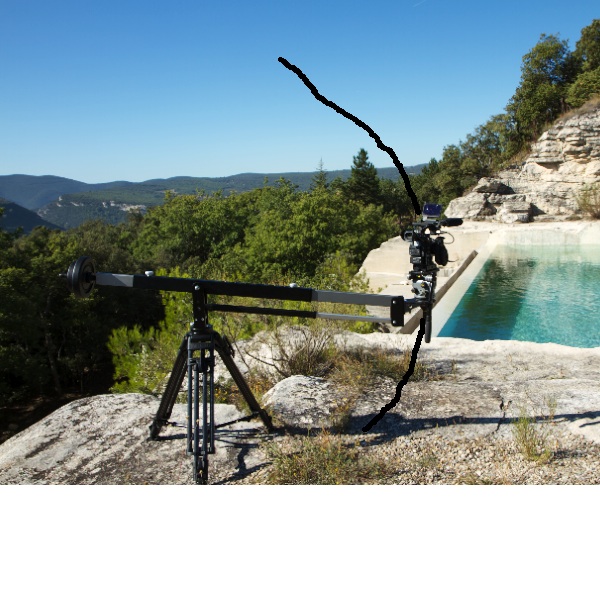
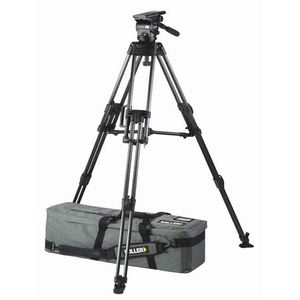
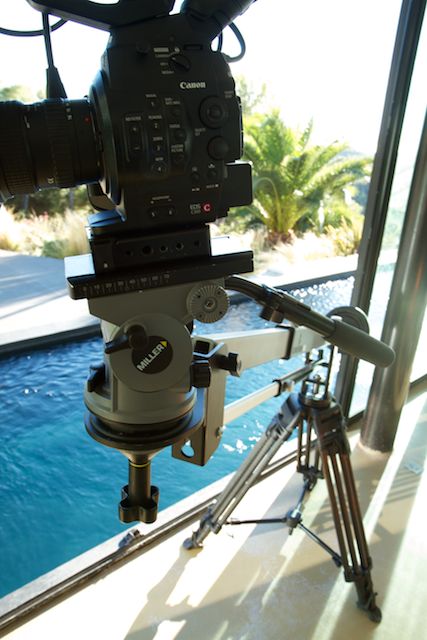
I knew the series was going to involve heavy grip equipment, jib shots were essential, as were tracking shots with a dolly , and I also wanted to take a slider in case there wasn't enough time to set up track.  For this kind of weight I needed the sturdy legs of the Miller Arrow.  


The jib alone weighed 10kg, by the time the C300 camera and 15kg extra of weights were added to balance the camera, the total load would have been around 30kg.  In addition to this we were filming "extreme" houses  these were often on unusual landscapes, and in one case on the side of a mountain in the Alps. Setting a jib up on sloping ground to get beautiful smooth shots, I needed legs that were absolutely rock solid, yet still light enough to carry around with a small crew of just three.  The Miller Arrow legs were great, they are lightweight carbon fiber and the lock offs are strong enough to hold the weight of the jib.  


The head of the arrow is really smooth and has several resistance settings.  This was really good for the jib and dolly work, as I often wanted the tension of the head to match the light resistance felt through tracking or moving the jib.  


 The 2nd tripod I took was the Miller DS20 


I took the DS20 as a 2nd tripod as I needed a tripod for the Assistant Producer to use with a my Canon 7d as a 2nd camera.  The tripod is light enough that it works well with a DSLR.  I also used the DS20 with the larger Canon C300 when I need to walk around getting GVs and didn't want lots of heavy equipment.


I am a huge fan of the DS20 for a few reasons:

1) It is incredibly lightweight with a small head and carbon legs.  It is great to just throw over your shoulder and walk around hunting for GVs.

2) The head is smooth for panning and tilting, unlike most lightweight tripods on the market

3) The head tilts up at an incredible angle meaning you can get up really close to something and shoot up almost vertically into the sky.  For an architecture programme this is great, as it allows you to get some really unusal angels, doing things like shooting directly up spiral staircases.

4) The legs work without a spreader and have three settings one of them is so wide that it lowers the tripod to the hight of a hi-hat or baby legs.  This is invaluble as it is like having a set of baby legs with you at all times, without having to carry around extra kit.


miller ds20

This shows why the Miller DS20 is so useful.  At normal height this shot of the Eiffel Tower was pretty boring, but getting down inches from the ground allowed me to get something more interesting.  With this shot set up, I just rolled for a while until the street was filled with the odd couple walking down the street with the Tower in the background and it ended up being a decent shot.


 In this shot the building I was filming had three levels of glass floor.  This was an unusual feature, but tricky to film, with most tripod you would end up shooting down and filming the tripod legs.  With the DS20 I could shoot directly down, and even pan up to each floor with no problem.

alt

How to use a reflector to bounce light

People obsess about camera gear, the latest cameras, lenses and LED light panels so I thought I'd write an blog entry on a very simple, very cheap bit of kit that I love, the reflector.


Here is a common situation: you are shooting an interview outside in bright sunlight and the options are

1) The subject looks into the sun, their face is nicely lit but they can't see a thing, as they are nearly blinded by the sun and are squinting.

2) The subject looks slightly off from the sun, they can now look at the camera without squinting but half of their face is in extreme shaddow.

3) The subject looks in the oposite direction to the sun, their face is all in even shaddow, so you can expose for that, and that background is totally over exposed.


None of these situations are ideal, so what you need to even things up is light.  There are all sorts of issues using lighting outdoors, such as getting power to the light, if it is  battery run how much power does it have, what is the quality of the light actually like etc.  There is one very quick, very cheap and efficient way of solving that problem and it is simply to bounce the sunlight.  There are all sorts of ways to bounce light, if you need a large area of light then a polyboard is ideal, if it is just a small amount of light for something like an interview then a reflector will do.  Reflectors are great, I pretty much always have one with me on a shoot, they are lightweight and pack down really well.

 alt

Lastolite 75cm Reflector - Silver/Whitealt

How to solve the three situations above:


In situation 1, you just have to have the subject wear sun glasses, this generally isn't great for TV, particularly if you can see the crews reflection in them.  

For situation 2 you can even up that shaddowed side of the face by bouncing some light.  The closer the reflector is to the subject the more powerful the light.  Reflectors tend to come in white, silver or gold.  White is easiest to use as it is fairly subtle, gold on the other hand really only works in the evening light and not with people with very pale skin as it is fairly dramatic.

Situation 3, is to my mind one of the best way to set up an interview in hard evening light when the sun is low in the sky.  I filmed this interview on a boat recently.  The sun is directly behind the interviewee casting extremely bright highlights all over the boat.  The interviewees face is in full shade, which is obviously several stops darker, and so to even this up a lot of light was bounced back using a gold reflector.  This meant I could close down a few stops, which was enough to keep most of the background highlights.

using a reflector

 Lastolite make good quality reflectors, usually with different colours on each side.  They pack down to three times there normal size so you can afford to get a decent sized one.


Lastolite 75cm Reflector - Silver/Whitealt


Arri Amira Canon c300 and Sony F5 Review

Almost two years ago now, Canon brought the C300 to the market and totally dominated.  In 2013 the most rented camera according to a Televisual survey was the C300 (Incidentally the Arri Alexa was second on that list.)  Since then Sony has launched the F5, and now Arri are launching the Amira.   All of these major companies are clearly aiming at the same place: a mid range camera, cheaper than the Alexa, but more usable than the black magic camera , C100, or  Sony's FS700.

 arri amira

The Arri Alexa is obviously a fantastic camera when it comes to picture quality, but it has loads of issues with usability when it comes to documentaries or any run and gun work.  The first of these is weight, it is a heavy lump of a camera to lug around without a large crew to help.  The second issue is power, the Arri Alexa sucks through batteries which can be a pain when you are out and about.  In order for the Arri Amira to be a contender in that mid range arena for the owner operator, it needs to look at both of these issues.  


There is certainly a lot of excitement about the Amira, so what is all the fuss about.  Firstly, Arri know what they are doing when it comes to making cameras, they have one of the most reputable names in the industry, and they promise a massive 14 stops of dynamic range with the new Amira.  The idea seems to be the quality of the Alexa in a rugged ENG body.

alt 

Secondly, they are deliberately aiming at the owner operator, ergonomically the camera looks like it makes a lot of sense.  Canon tried this too with the C300, but the body shape is still a bit odd, it is quite top heavy and once the camera is off the tripod, put it on the floor and it easily topels over. The Arri website shows a much more balanced camera with a dove tail shoulder mount, sitting happily on an operator's shoulder and on a dusty road, clearly Arri have thought about who they are marketing to.  Sony also went a long way to solve the ergonomic issue with the f5, but Arri appear to be going one step further with the Amira.


What about lenses? According to Arri the Amira will have three different mounts the B-4, EOS or PL.


And the best bit?  The chip of the Amira is going to give the same picture quality as the Alexa,  essentially a cinema camera.  If a client is unsure about your camera, you just tell them Roger Deakins shot Skyfall on it, and that should be enough. Additionally the Arri Amira will shoot 200 frames per second at full 1080 or 2k, far better than the c300 with 60 frames at 720.  


Some people may be concerned about 4k and about future of a 2k camera, but realistically how many people do you know with a 4k TV and how many channels do you know that broadcast in 4k?  Another point about this is many films are shot on the Alexa, and then blown up in 4k cinemas, and so far I haven't heard of many people asking for their money back.


So the big question, how much? As yet this hasn't been announced, although CVP in England are guessing at 25K.  Since the c500 sells for 17k I would guess that somewhere between 17 and 25k would makes sense.


Buying lenses and cameras from the online grey market

Everyone has done it, you search for the camera or lens you want, and you see a company selling the same product for less, but it is from Hong Kong or some other country that you don't live in, and the big question is: should you buy it?

Buying a product like this from the "grey market" is always a little bit risky, but that savings can be quite big, so it is worth weighing these things up.

Here is an example:

The Tokina 11-16mm ATX Pro has an RRP in the UK of 630 UKP, most UK based online retailers actually sell this for around 500 UKP but you can get this lens from Hong Kong from Digital Rev for 350 UKP.  Saving a few hundred pounds on a lens is obviously a big deal.

Firstly there is the risk of buying the goods abroad, is the company reputable, will you actually get the lens, is the lens genuine.  I think with big players such as Digital Rev in Hong Kong, you don't need to worry about receiving the lens, they are a decent company and stock genuine products.  With any other supplier it is worth doing a bit of reseach on line to make sure.


The next big issue with the grey market is the waranty and returns policy.  The product will have a serial number that indicates where it was bought, a Hong Kong serial number will usually mean that the distributor in your country will not repair or replace this lens for you if there are any issues (unless you happen to live in Hong Kong).   So, what happens when you buy a product from Hong Kong and it breaks under waranty? There are a couple of options 1) You send it back to Hong Kong for repair, 2) You send the product in for a quote in your own country, send the quote to Hong Kong and get them to cover the costs.  The major factor with both of these options is time.  In both cases, you are looking at weeks to get the problem sorted, if you are an amature film maker or photographer a few weeks might not be an issue, if you make your living by using this product, you probably need a third option (by far the quickest)  3) pay for it yourself.


I recently had a lens repaired at PJ Camera Repairs Direct http://pjcrdirect.co.uk They are based in the midlands in the UK and provide a fantastic service.


So to answer the original question about buying products off the grey market, if you are buying a product that is reasonably cheap it could be worth the gamble, if it breaks in warranty and you get it repaired, you probably still won't be out of pocket as the savings are pretty big.  That said, I defintitely wouldn't consider buying more expensive items such as a camera body as I would prefer to get these serviced locally.

UPDATE:

I urgently needed my Tokina repaired so I had it fixed by PJC direct in the UK, after a few emails with Digital Rev they agreed to pay the costs in full.  


peli cases for tv cameras and the canon c300

There are two things without which all TV and film production would cease: gaffer tape and Peli cases.


Checking into a hotel in the Carribean. Still plenty of room on that cart.

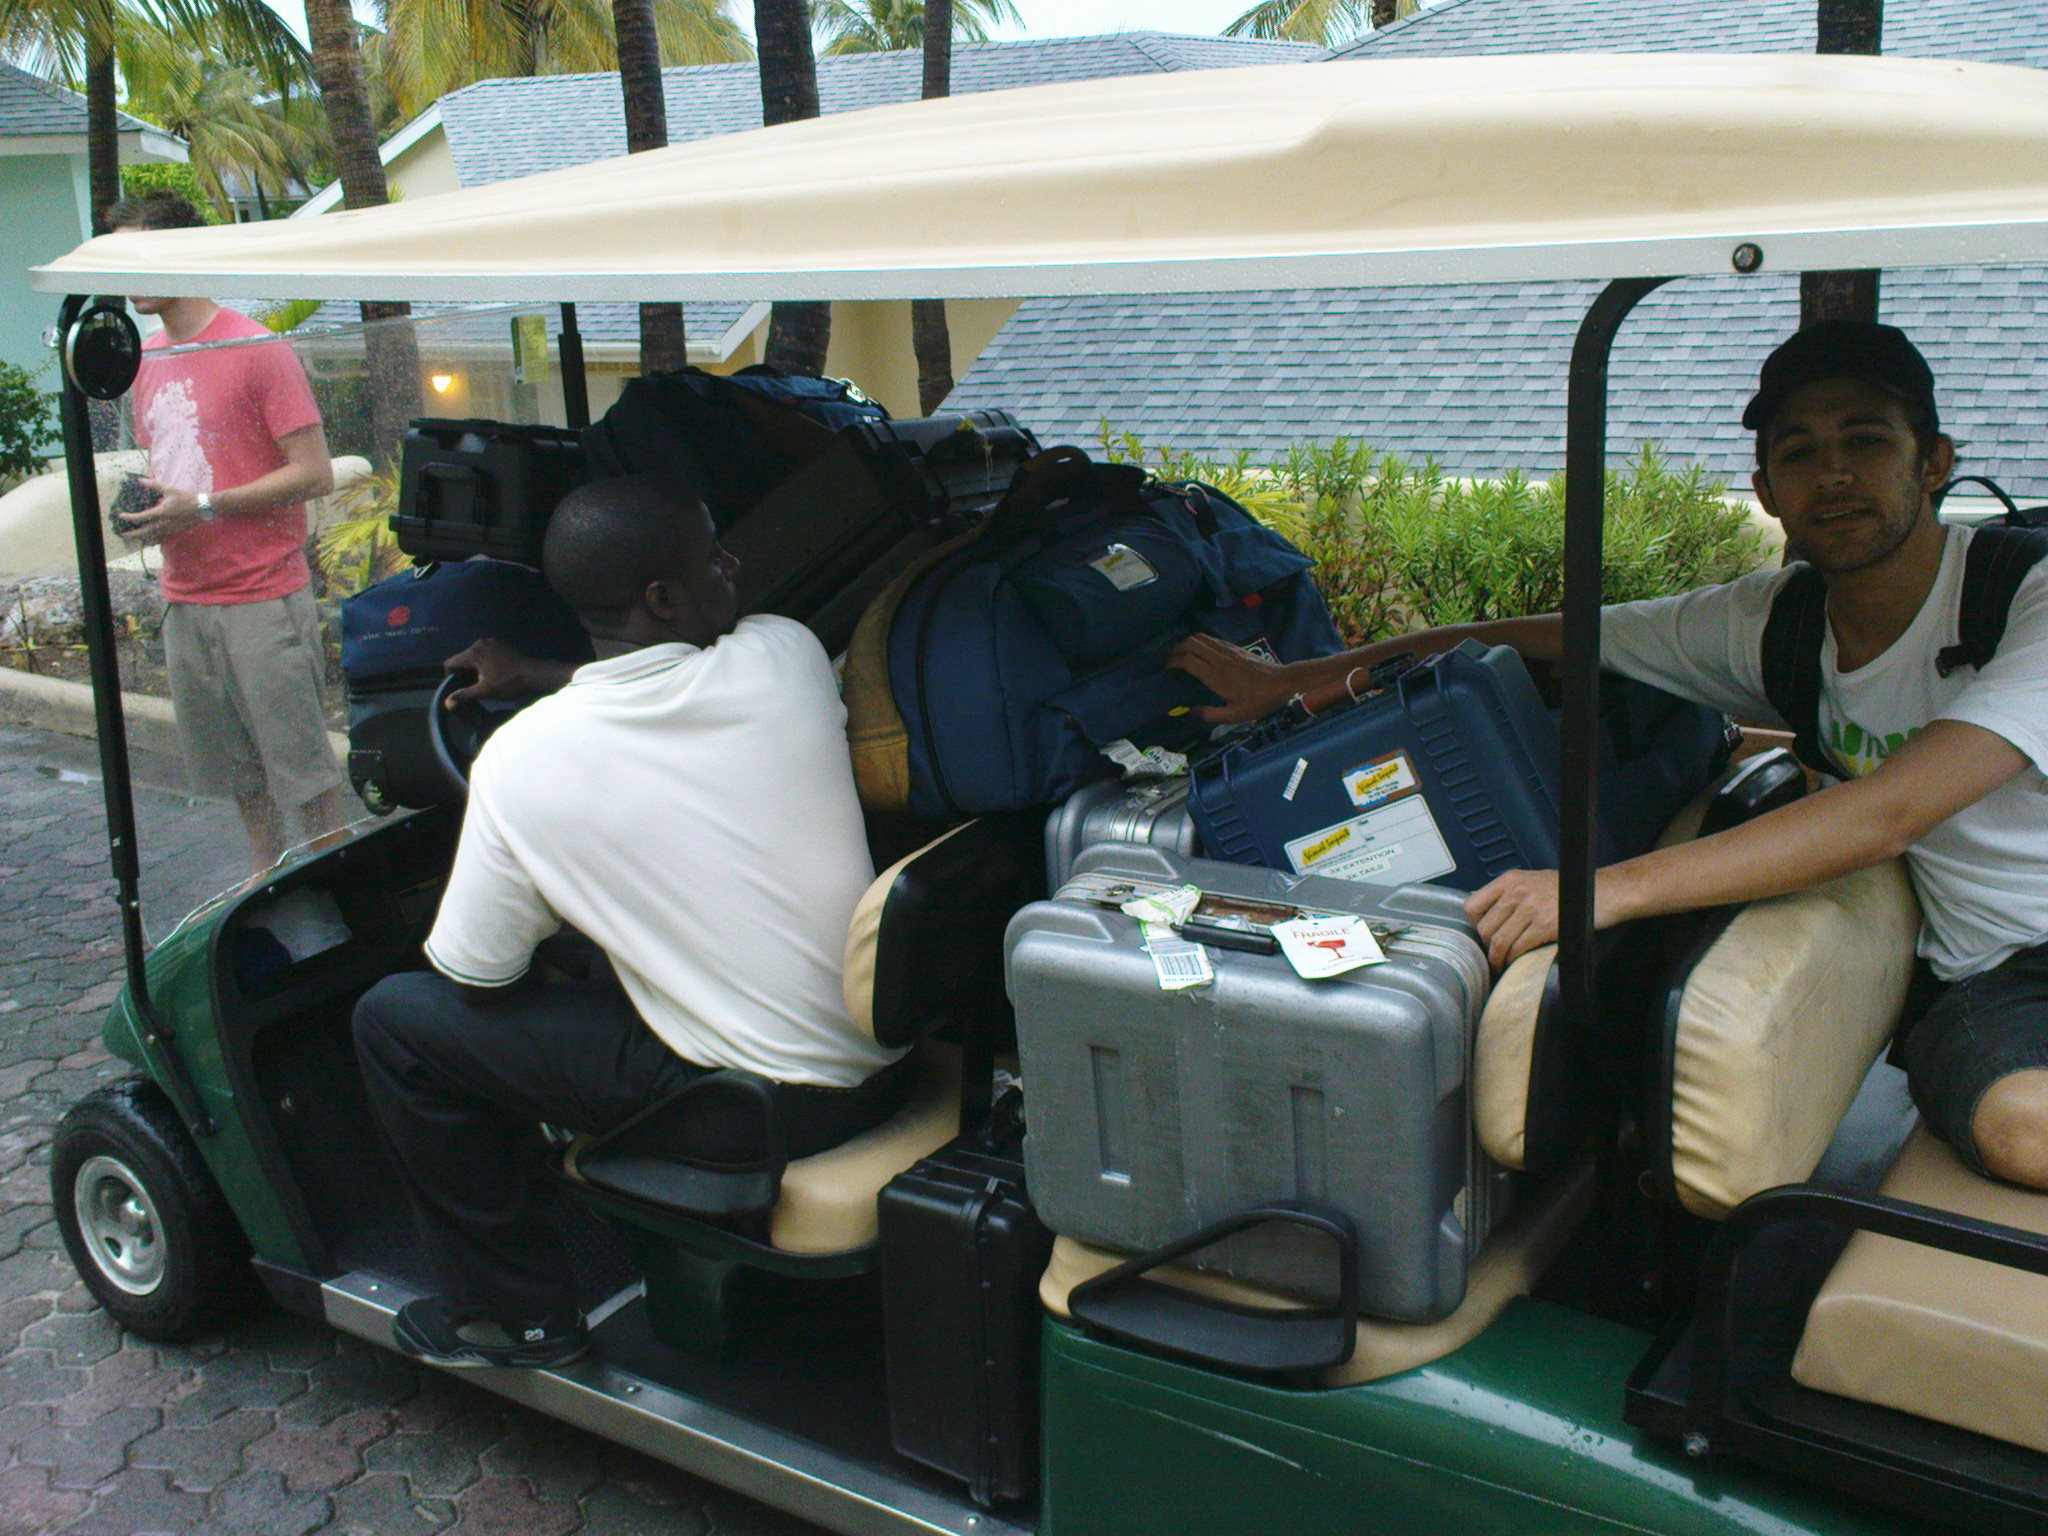
In the airline industry I have honestly heard baggage handlers reffered to as "throwers", this is not without good reason.  I once sat on a plane that had just landed and watched a man literally hurl our entire TV kit onto the truck below.  There were thousands of pounds of equipment (both in weight and money) but none of it suffered as it was all tightly packed away in trusted peli cases.


Most of the reviews on my site are accompanied with a comparison to other similar products, here this isn't necessary as you don't need to look much further if you want your kit well protected.   Peli cases are rock solid and they are the kind of things that you buy and then keep for a lifetime.  I worked for a company sometime back that had an ancient lens in a very old peli case that had travelled the world many times over and had an extremely tough life.  One of the catches had been damaged and so the company wrote to Peli to ask for a replacement catch.  Peli said the catches should never break and sent a brand new Peli case for free ... not just the catch an entire case!  Seriously, this case was old and had been hammered on many hundreds of flights, but no questions were asked, and the thing was replaced, THAT is customer service.

peli cases for tv gear


This is my personal collection and I'll admit it is probably getting a bit out of hand.


Peli cases come with 3 options for inner linings: laser cut foam, pick and pluck foam or velcro padded dividers.  I always go with the padded dividers, as that way I can adjust the various compartments when I buy new cameras and kit, or even when I am packing for certain jobs that require a certain amount of gear.


alt

This is the Peli Storm IM2700  packed with my Redrock rig, a monitor a follow focus, batteries, chargers and other odds and ends.

The IM2700 is a good sized box, as fully loaded it is still manageable to carry around without wheels.


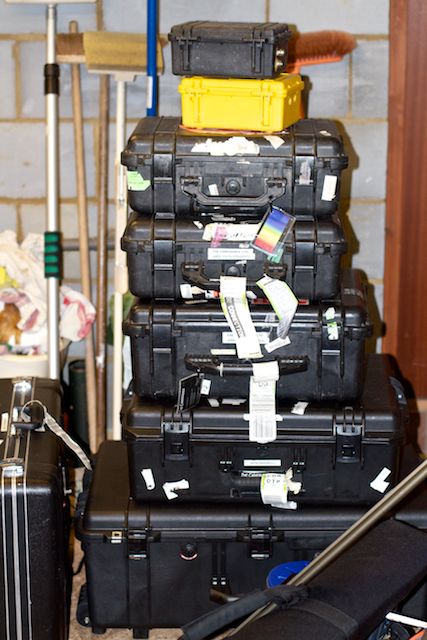
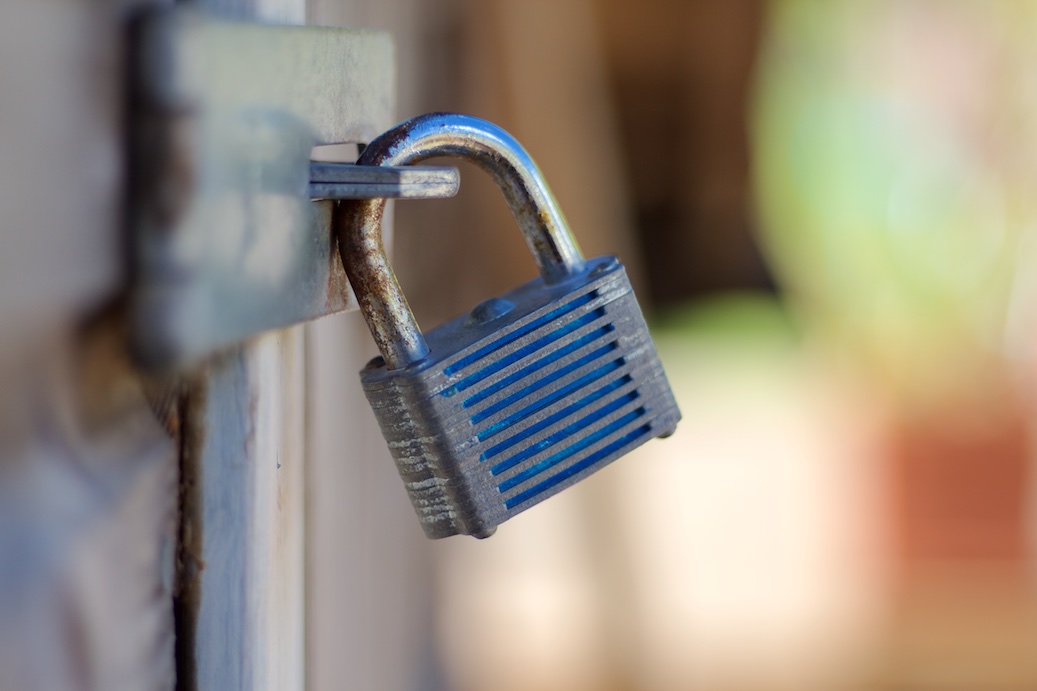
The locks on these cases are great, you need to push the button to open them, that way they are not going to accidentally pop open on a flight.
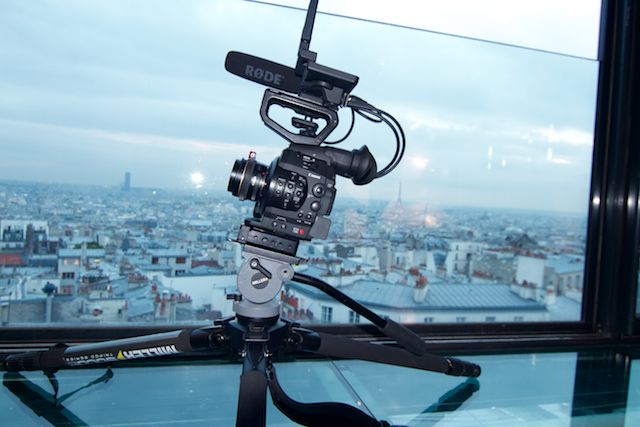
 alt    alt


This is the largest Peli case I use.  By carefully packing this thing, I can get the Canon C300, several lenses, batteries, a shoulder rig, audio kit and a monitor, to give me a really mobile kit.  


The Peli 1650 has wheels and an extendable handle so it is easy to move about with.  The one issue with a case as large as this is the weight.  When the case is fully loaded up it weighs nearly 30kg or 66lbs, most airlines will have a problem with this.  British Airways have an extra charge on bags over 23kg or 51lbs and most airlines have some kind of restriction on bags over 20-23kg.  This case is fantastic for holding large amounts of gear, just pack carefully before flying.  


 alt   alt


Miller tripod DS20 review

It is rare that I shoot on a full size broadcast camera these days, and am much more likely to be shooting something mid size like the Canon C300 or Sony F5.  As the kits get smaller I decided it was time to look at getting a smaller tripod.


miller arrow tripodMiller Arrow


I have owned a Miller Arrow 50 for years and bought it as an alternative to the Sachler V20.  The head is somewhere between that on the Sachtler V20 and V18 in terms of size and pay load.  I mainly used this for full size broadcast cameras.  This is a great tripod and I have had a lot of good use out of it, although recently I started to wonder whether I could get away with using a smaller tripod for my Canon C300.


One of the problems with lighter weight tripods is the tend to be fairly low quality so I looked around for a while before deciding on trying out the Miller DS20


Miller DS20Miller DS20


The Miller  DS20 is a great little tripod.  It cost around 1000 UKP or 1500 USD.  The payload is 10 kg which will accomodate my Canon C300 even when it is loaded up with the Redrock shoulder rig.  The head is great, really smooth and has the kind of quality that you would expect for a tripod of this price.  The base plate is longer than the head, which gives you plenty of forward and backwards travel so you can  balance out the camera and change it quickly when the weights change from different lenses or monitors.  One of the good aspects about this tripod is the legs,  they are carbon fiber, so light weight but well protected as they are telescopic and covered by a layer of foam.  The best thing is about the tripod is the range in height you can get with.  Fully extended it reaches well over head height and it can get down really low by splaying the legs far apart.  With a full size tripod you would need a high hat or set of baby legs to get down this low.  Another little addition is the spikes on the feet which are revealed by a twist of the feet.  All in all this is a fantastic tripod for anyone using camaras in the 5 to 10kg  range.


More Articles ...

  1. How much do cameramen make?
  2. Camera simulators
  3. filming pack shots
  4. How to Light For Green Screen
  5. What is the best zoom lens for Canon and DSLR video
  6. Canon C300 magnify focus assist
  7. Cheap LED light panels, are they worth it?
  8. Hitchcock's filming techniques
  9. Cameraman inspiration
  10. why you need a sound recordist
  11. How to become a Cameraman
  12. How to update Canon C300 with new firmware
  13. Manual Iris Lenses
  14. Camera Slider Review
  15. Which Tripod to buy for video
  16. Canon C300 Rigs
  17. vignette on EFS 17-55mm lens on Canon C300
  18. Which DSLR lens to buy if only buying one
  19. PL Zoom Lenses Fujinon and angenieux optimo
  20. Kate Middleton Portrait artist Paul Emsley for National Portrait Gallery
  21. Sony PMW F5 vs Canon C300 vs RED
  22. Upgrading from DSLR 7d or 5d is it worth it?
  23. Canon C300 Custom profiles and gamma curves
  24. Lens comparison and crop factors
  25. Can you use the Canon C300 for reality/entertainment shows
  26. Should I buy the new Canon C300?
  27. super slow motion
  28. Used camera equipment
  29. How to get perfect skin tones on a DSLR 7d or 5d
  30. audio recording with 7d and 5d
  31. Using a 7d for broadcast actuality scenes
  32. Some thoughts on the new Canon C300 compared to the RED scarlet and the Sony F3
  33. Screen Protector for TV logic Monitor
  34. Using a DSLR for Broadcast work
  35. What to look for when buying a DSLR lens for video
  36. Which DSLR rig to buy
  37. Which lens to Buy for a Canon 7d when shooting video
  38. DSLR toplight LED light panel
  39. where to buy DSLR video gear in London
  40. Calibrating a DSLR monitor
  41. Cheap monitor sun hood for dslr
  42. DSLR monitor and EVF review
  43. Which HD Video Camera to buy for professional corporate or broadcast work
  44. Building a DIY slider UK
  45. CF card reader speed
  46. Filming a football promo with a 7d
  47. Shooting with the new Sony F3
  48. BBC Horizon Shoot